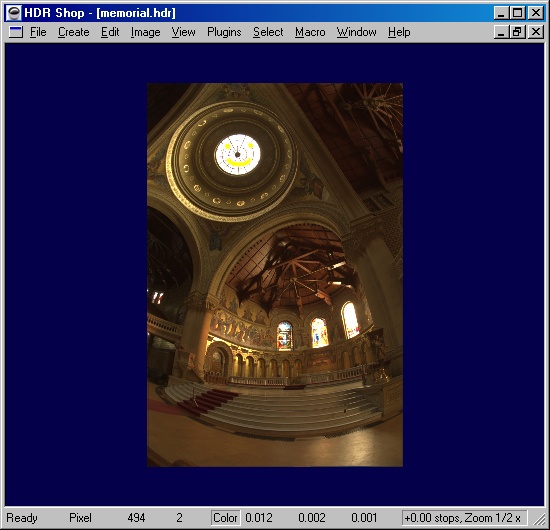
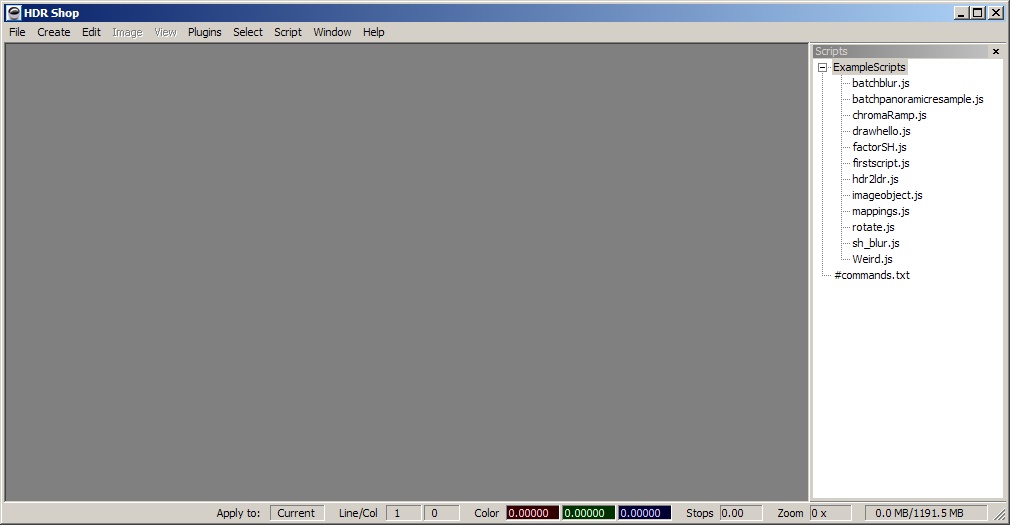
To load an image into HDR Shop, you can either choose Open... from the File menu, or simply drag the image file onto HDR Shop. You can also open
multiple files at the same time this way, by choosing them in the Open File dialog or dropping them on HDR Shop.
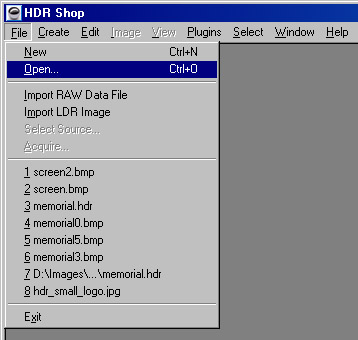
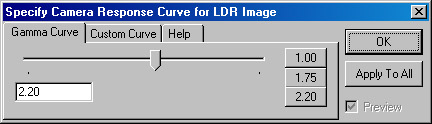
If the image loaded is a high-dynamic range format, it loads up instantly. However, if you are loading a low-dynamic range format, HDR Shop pops up the "Specify Camera Response Curve" dialog:
The reason for this is that HDR Shop stores image pixels internally as numbers relative to the amount of light they represent. Unfortunately, the 8-bit pixel values in most traditional
images don't have this property. For example, in a jpeg, a pixel of 200 is not twice as bright as a pixel at 100. In fact, in most formats, it is over four times as bright. The standard
mapping (on PC's at least) is called a gamma 2.2 mapping. This means you take the pixel value and raise it to the 2.2 power to get a number proportional to the amount of light. So, for
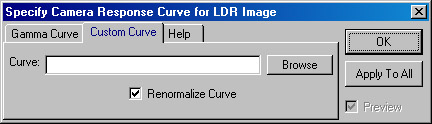
most images, you can just use the default gamma 2.2 curve. If you want to be more precise, you can derive the exact curve for your camera by going through the Camera Response Curve
Calibration tutorial. You can load the resulting camera curve through the 'Custom Curve' tab on the dialog:
Now that you have an image loaded, the general interface controls can be found under the 'Help->Quick Help' menu entry or by typing 'Ctrl+H'.
Let's perform a simple operation on the pixel values so that they are all scaled by 1/2. Under the 'Image' menu, choose 'Pixels->Scale...'. Enter '0.5' in the Red, Green and Blue boxes and hit 'OK'. The image pixel values are scaled by 1/2.
Save an ImageNow let's save the image in a particular format. From the 'File' menu, choose 'Save As...'. A window appears and you choose which image format to save the image as. Choose a format, location and filename and hit 'Save'.
A digital camera sensor typically has a near-linear response to light within its limits, but in an effort to make the images relate to photographic film images,
the linear values are scaled in the camera according to some non-linear function. When the LDR images are loaded in a typical image viewer it automatically applies
a fixed reverse response function (gamma correction) in order to make the values appear linear on whatever display is being used. The camera curve calibration tool
allows you to recover the camera response function that was applied from a sequence of images of a scene taken from a fixed viewpoint,
requiring only that you specify the relative exposure differences between the images in the sequence.
In order to recover a camera's response curve you need to have a sequence of images taken with the camera from a fixed viewpoint on a static scene, You also need to
know the relative exposure differences between each image in the sequence. The recovery tool works best with exposure differences of less than or equal to 1 stop,
although it should also work for larger differences and even for non-uniform differences. If you use a good exposure (that has both saturated regions, black regions,
and stuff in between), the calibration can work with as little as two images, but in most cases you probably want to get four or five images to get a good curve.
Once you have the images, start up the Curve Calibrator in HDR Shop, which is under the Create menu as "Calibrate Camera Curve". The "Select Calibration Image Sequence" dialog box will open:
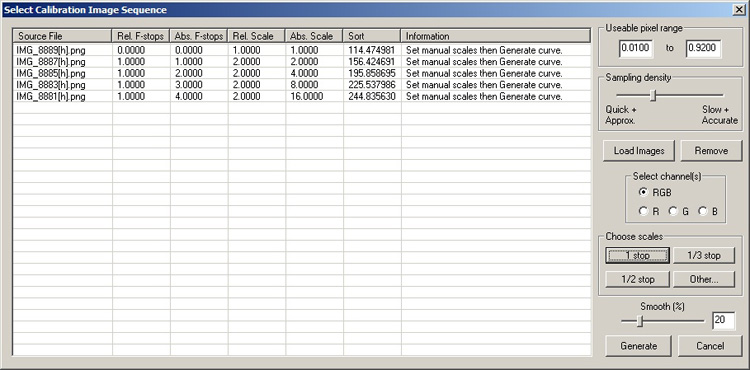
Set the 'Sampling density' slider and 'Usable pixel range' values (see below) and drag the images on to the window or use the 'Load Images' button. Loaded files are
sorted automatically in order of increasing average brightness (displayed in the "sort" column). The tool computes which of the images has an average closest to 50%
illumination (the 'best' image to sample from). and computes the locations of as wide a sampling of the possible 0-255 pixel values in each channel in that image. A
subsample of the possible 256 values is selected based on where the 'Sampling density' slider is positioned (where the left position is the minimum possible number
of samples that will allow curves to be computed and the right position represents as many of the 256 values that exist - this value affects the speed and accuracy
of the final computation). Also note that the 'Usable pixel range' values specify the range of pixel values that are considered in all calculations involved in
deriving curves. The default values have been obtained through experience in our experimentations and should be adequate for most purposes.
Now you need to enter an exposure for each image in the sequence. You can enter the data in four different formats, corresponding to the four different columns.
"Abs. Stops" for example, is the exposure of each image in absolute stops. "Rel. Stops" is the exposure difference in stops relative to the previous image. The
scale columns store values in terms of their linear scale multiplier. If the entire sequence is taken at a certain stop increment, you can choose one of the
"Preset Scale Increments" to reflect the values already computed. Note that the worksheet boxes are editable so that you can set exotic or non-uniform values
for the scales.
By default, you are entering values for all three channels (Red, Green and Blue) simultaneously. If you want to enter different values for each channel, you can
select R, G, or B in the "Select Channel(s)" box to enter values there. This is mainly useful if you are using filters to control the exposure level, as even
supposedly "Neutral Density" filters are not always entirely neutral (that is, they tend to block more blue light than red light).
Choose the strength of the smoothing factor that will be applied to the computed curves. A small value may produce curves with a very bumpy shape
and a large value will smooth out any features completely. The default value represents a reasonable value based on experience.
Once all the information on the images that make up the sequence is correct press the 'Generate' button. The image samples will now be loaded. At this stage
you may encounter an error if the selected usable pixel range and/or sampling density is too restrictive. Simply start the tool again and choose a wider range
before re-loading your image sequence. The tool populates a matrix with the sampled locations from all the images and then attempts to solve all available
samples into a curve for each channel:
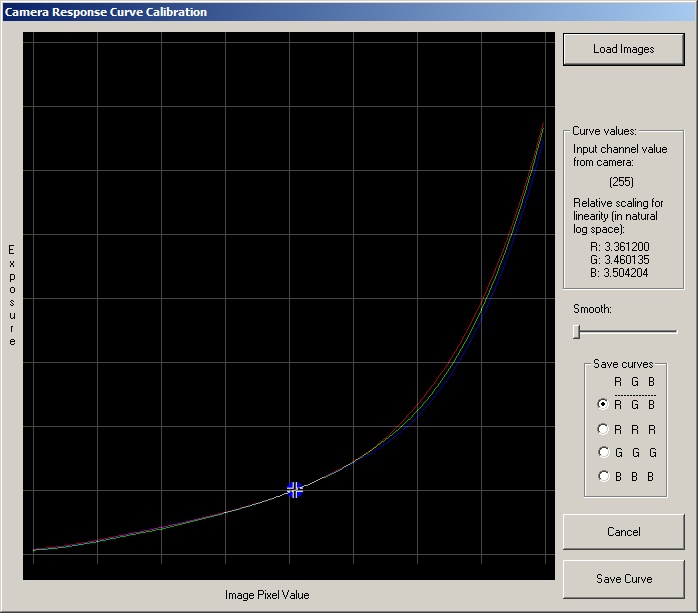
The blue cross in the middle allows you to control the scale of the visualization of the curve. It has no effect on the solver, it just lets you inspect different
areas of the curve. The changing R,G,B values as you move the cursor over the image tells you how much the pixel value in parentheses should be scaled in natural
log space in order to make the image appear linear.
Specify a further smoothing factor now to remove any bumps which do not appear to be part of the curve.
Once you have a curve you like, you can save the curve to a file for later reference. The default is to save the 3 separate curves, however if one curve seems more
viable than the others you can choose to save 3 copies of any individual channel as the output by choosing the relevant channel radio button. Alternatively,
use the 'Load Images' button to start over.
Quick 'n' Dirty instructions:
That's it - the default values should give you close to the best possible HDR image. If your image looks weird or substandard, then read the rest of the tutorial so you can find out how to tweak the dialog parameters...
HDR Shop allows you to create a high-dynamic range image from a sequence of images taken at different shutter speeds. The feature has been improved for the release of HDR
Shop v3.0 such that HDR images can be computed from any LDR or HDR image format, including any RAW digital format. The relative scales between images can now be calculated
automatically using either pixel values or EXIF data, or the scales can be specified manually for greater control.
Shooting a sequence: The images should be taken without moving the camera, and should ideally be bracketed so that the darkest parts of the scene are clearly visible in the
longest exposure and the brightest parts of the image are not "blasted out" to white in the shortest exposure. Note however that HDR Shop v3.0 will compute if the darkest
image contains very bright values (as happens when the scene contains direct sunlight) and apply a correction to make these values usable in the final image.
Once the minimum and maximum exposure levels have been determined, choose an exposure interval. The interval depends on many things, in particular how well the camera's
response curve is calibrated. If the response curve isn't known, it is recommended that you take
the images in the sequence close to each other, for example 1 stop apart. Once the camera's curve has been well calibrated, you can take the sequence further apart, eg.
at 3 stops. As a rule of thumb, you should never take the images too close together, so when in doubt take the sequence 1 stop apart. Then, even if the camera curve isn't
calibrated well, you will still get decent results. Note that HDR Shop 3.0 uses a new dynamic weighting scheme which means that assembled image quality is good even when
using images taken with a non-constant change in exposure, however the best HDR images are still obtained with a constant exposure change,
so you should try to plan taking such sequences if possible.
To begin, pull down the Create menu at the top of the screen, and click on Assemble HDR from Image Sequence. This will pop up the "Assemble HDR Image" dialog box.
First, if your images are LDR, you need to specify the response curve of the camera that generated your images. You can skip this if you are confident that your camera has
a 'standard' gamma 2.2 response (most modern digital camera images look fine with this value). Note that if your input images are 'RAW' digital or 32-bit, they are automatically
classified as containing linear data and a curve does not need to be specified. As mentioned above, the curve can be calculated as described in the previous tutorial. Click on
the "Change" button to select that camera response curve. If you know that the camera uses a standard gamma curve, you can enter that directly. Click on the "gamma curve" tab
and type in the value of the gamma curve. Many cameras are close to a 2.2 gamma curve or else they are linear, which is equivalent to a gamma value of 1.0. For better results,
you can use a response curve that you have calculated. Click on the "Custom Curve" tab and enter the filename of the curve in the text box, or click "Browse" to select the file.
If the "Renormalize Curve" checkbox is selected, HDR Shop will automatically rescale the curve so that the maximum value is 1. For assembling an HDR image from a sequence,
this check box should always be selected. Once the appropriate curve has been loaded or selected, click "Ok".
Next, you need to load in the image sequence. If you know that the images contain EXIF data and you do not want to use this data to compute the relative scales between images,
uncheck the 'Use EXIF' checkbox. If your sequence consists of digital camera RAW images, the default behavior of HDR Shop 3.0 is to use the EXIF data to get the relative scales
between images, then load in the uninterpolated RAW data as a single channel image (representative of the raw Bayer image). Assembly is then done on the single channel image,
which is then interpolated using an advanced algorithm (see the manual 'Image->Filter->Interpolate Bayer Pattern' menu entry for more information). You can override this behavior
by checking the 'Predevelop' box although this slows the process significantly and doesn't necessarily produce any better results. The 'Predevelop' option causes each RAW image
to be demosaicked before assembling the sequence into an HDR image. You would use the 'Predevelop' option when EXIF information is incorrectly read by the assembly tool. Drag
the images on to the dialog or click the "Load Images" button. The image file names should now appear in the worksheet in the dialog box.
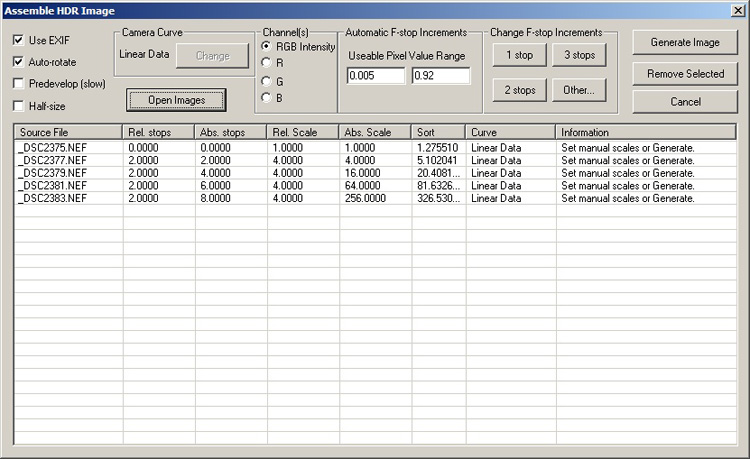
The images in the worksheet should be in order from shortest exposure to longest exposure. HDR Shop will automatically sort the images based on the average brightness of the pixels
in each image. This brightness is displayed in the "sort" column. If this order is incorrect for some reason, you can manually enter values into the "sort" column for each image,
and HDR Shop will sort the images based on the numbers you enter. If EXIF information is avaliable, the images will be sorted from this.
Next, you can choose either to tell HDR Shop which images were taken at which exposure settings or just let the software calculate these values automatically. For manual entry,
these values can be specified per color channel, or for the entire image. For most applications, the relative exposure levels of the different color channels will be the same.
In the "Select Channels" area, the "R=G=B" button should be selected. If a single color channel is selected, then the values entered in the worksheet will only apply to the
currently selected color channel. For most normal sequences, the automatic setting produces good results.
Most of the time, the images in your sequence will all have been taken at a fixed f-stop inverals. If you want to enter manual fixed scale values, press the appropriate button
in the "Use Preset Scale Increments" area. If the images were taken at some other f-stop interval, press the "Other..." button and enter the increment by hand.
When the f-stop increment is selected, you notice that the values in the "Relative Stops" column should all be equal to the f-stop value you selected. The column indicates how
many f-stops brighter the current image is from the previous image. The "Absolute Stops" column indicates how many stops brighter the image is from the first image in the sequence.
Similarly, the "Relative Scale" column indicates how many times brighter the current image is from the previous image, and the "Absolute Scale" indicates how many times brighter
the current image is from the first image in the sequence. The scale values are the base-2 log of the f-stop values, since f-stop is an exponential measurement of exposure level.
If the images were taken at a non-uniform spacing, you can also enter in any of these individual values by hand by simply clicking on the appropriate cell in the worksheet and
typing the value. Note that this will automatically update the other values in the row.
If you are allowing HDR Shop to automatically calculate the scales, you may need to check the usable pixel range in the images. Sensor pixels saturate at different levels and can
sometimes include spurious values at the extremes. Occasionally you can find pixels in areas which you know to be saturated (typically > 0.92) but only showing values of 0.85 or
less. In this case, reducing the upper bound to less than 0.85 will exclude values greater than this. For most cameras, the default upper and lower bounds will produce good quality images.
Check whether you want the output image to be half-sized with the 'Half-size' box. Half-size speeds up the processing when using the 'Predevelop' option and when assembling LDR
images (the half-size gets done on the images before assembling in these cases). Half-size on RAW images using EXIF data just does a half-size after all other processing and so has no performance benefit.
Auto-rotate option: Many modern cameras have an orientation sensor that flags the image if it was taken in eg 'portrait' mode so it can be rotated in an image viewer for easier
viewing. Checking this box (default) forces the HDR assembler to rotate the image to the same orientation as the camera when the image was taken - ie portrait shots appear in a portrait orientation.
When the images have been loaded (and optionally the camera curve selected, and the relative brightnesses specified), press the "Generate Image" button to compile the images into a single HDR image.
HDR Shop can be used to resample panoramic images between the following formats:
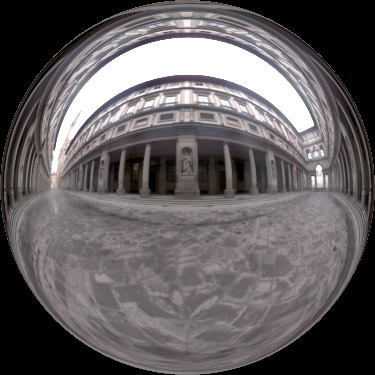
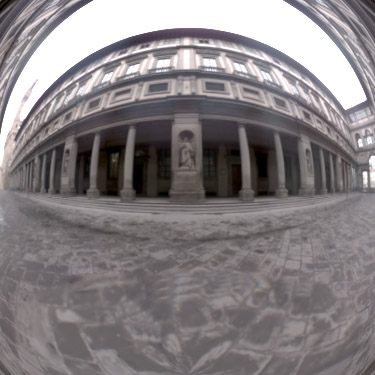

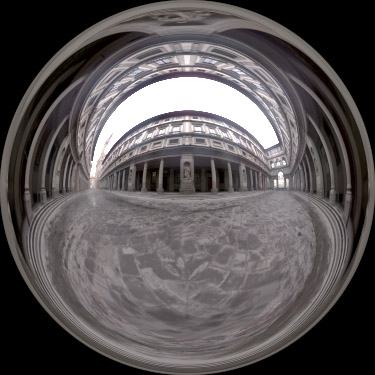
This tutorial explains how to resample a "mirrored ball" panorama into "cube map" format. Click here to download a high dynamic range version of the Uffizi panorama (above) in a mirrored ball format.
Once you have your mirrored ball image loaded in HDR Shop, choose "Panoramic Transformations…" from the menu, under "Image", "Panorama". The following dialogue will pop up:
The Source Image box should have your mirrored ball panorama selected. If the correct filename is not there, click on the down arrow at the end of the field and select the correct file
from the list that appears. The list contains only files that are currently open in HDR Shop. You should also select the source image format; in this case the default "Mirrored Ball" is correct.
The Destination Image field is best left alone. If you choose one of the files instead of "New Image", that image will be overwritten by the result of the panoramic transform. Select
"Cubic Environment" as the destination image format. You can also change the destination resolution by changing the Width and Height boxes.
The sampling box allows you to choose a super-sampling pattern, as well as toggling bilinear interpolation. Increasing the super-sampling helps remove aliasing (jaggies). This is
especially useful if you are creating a small panorama from a big panorama. Note that the number of samples used is actually the square of the number entered; so if you enter a 3,
then HDR Shop will calculate 9 samples per pixel. Bilinear Interpolation, on the other hand, helps most when you are going the other way, creating a big panorama from a small one,
though it doesn't hurt to leave it on otherwise.
The 3D Rotation box allows you to rotate the environment, either through an arbitrary rotation (about the x, y, and z axis), or by attempting to match points in one panorama to
points in another panorama. Again, lets just use the default, 'None'.
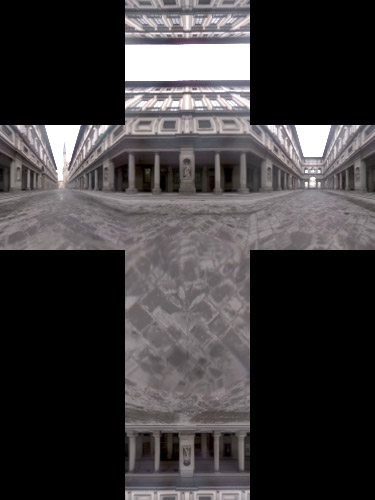
When all your settings are correct press the OK button and HDRshop will resample your mirrored ball image into a cube map.
A light probe is an omni-directional (360° panoramic) high-dynamic range image. Because they 'see' in all directions and can record actual light levels, light probes are useful for
providing measurements of the incident illumination. As such they can be used to provide interesting and realistic lighting environments and backgrounds for rendered graphics.
This tutorial describes how to create a light probe using HDRShop. In general, this involves the following steps:
One method of obtaining a light probe is to take a high-dynamic range image of a mirrored sphere, such as the Precision Grade Chrome Steel Balls at McMaster-Carr. Assuming your camera
is orthogonal, then in theory a single photograph of the mirrored ball can 'see' in all directions. That is, anything visible from the viewpoint of the mirrored ball will be visible
to the camera as a reflection in the ball.
Unfortunately, things that are reflected near the edge of the ball will become extremely stretched and distorted, giving a poor image when it is unwarped. Additionally, in the center
of the ball will be a reflection of the camera used to take the photograph, which will obscure some of the background.
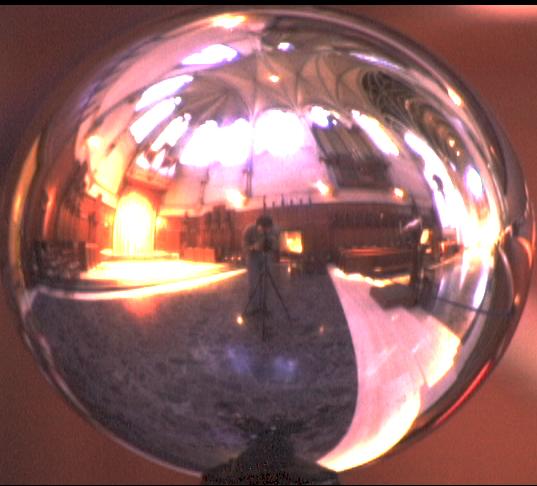
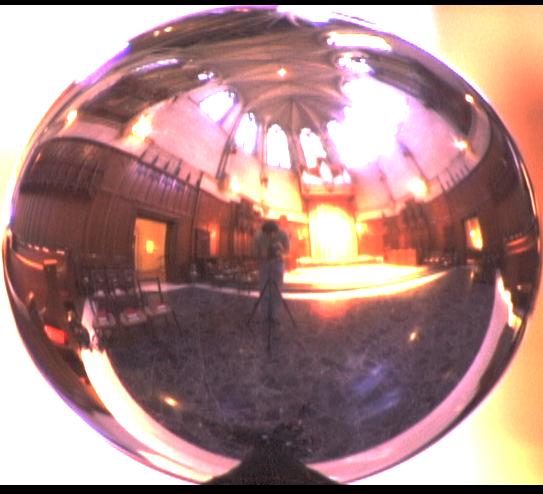
To alleviate these problems, we can take two pictures of the mirrored sphere from different angles and blend them together to remove the camera and the regions of poor sampling.
Since the two 'bad' spots in the mirrored ball are directly towards the camera, and directly away from the camera, the two pictures should be taken from positions 90° apart from each
other (see figure 1). This way the regions of bad sampling and camera interference will be in different locations in the two images. (Note that taking the images from opposite sides
of the ball will not work, as the region of bad sampling in one image will be the location of the camera in the other image, and vice versa.)
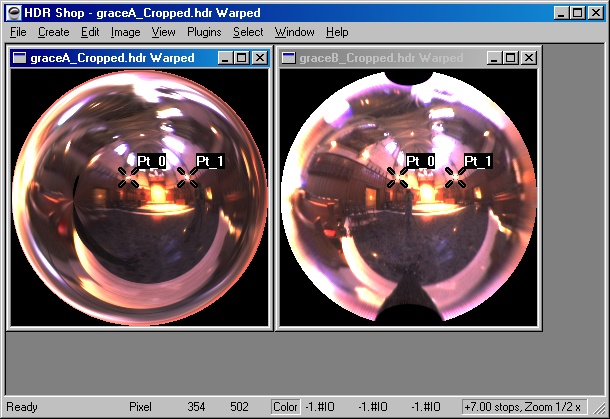
You should have a pair of images that look something like this (in high-dynamic range):
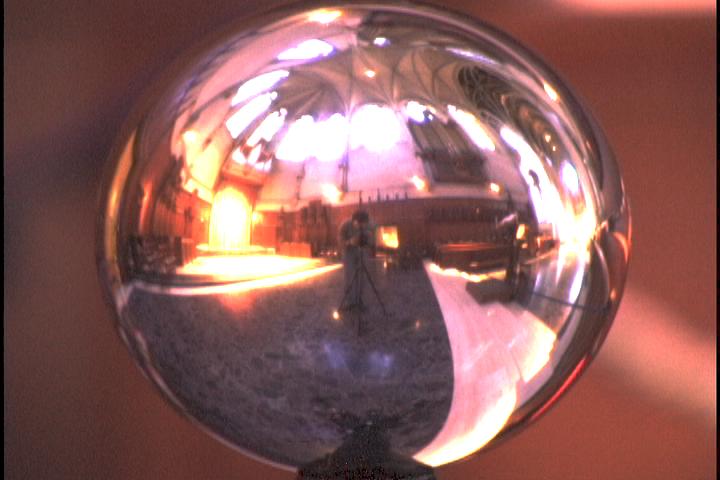
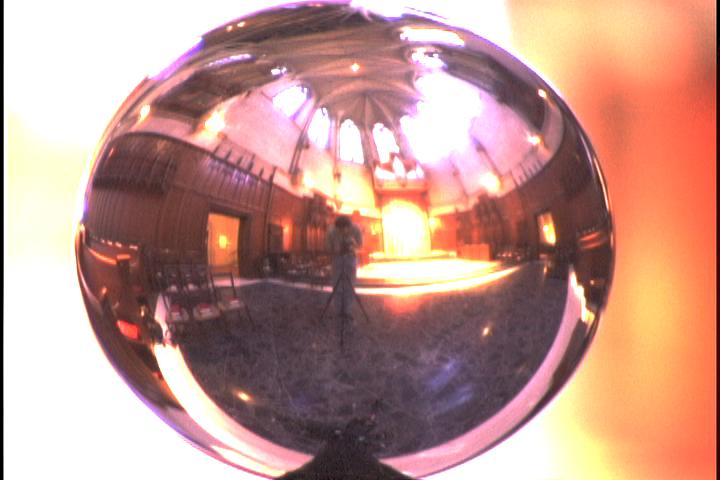
If you wish to use our example images, you can download them here: graceA.hdr, graceB.hdr
A note to the advanced light prober: it is OK for the camera to crop the top and the bottom of the mirrored ball a bit; these directions are recoverable from the other photograph.
HDRShop can then be used to warp these images to a better panoramic format, and rotate them in 3D so that their orientation matches.
The next step is to crop the images to the very edge of the mirrored ball:
First make sure that the "Circle" option is checked. This can be found in the Select menu under Draw Options. Checking this will draw an ellipse inscribed
in your selection rectangle, which can be useful for matching up the edge of the mirrored ball with your selection.
If the mirrored ball goes off some of the edges in your photograph, make sure that the "Restrict Selection to Image" option is unchecked. This can be found
in the Select menu under Select Options. Unchecking this will allow the selection tool to select regions outside the bounds of the image.
Select the region around the mirrored ball, and adjust it until the circle borders the edge of the ball. It should look something like the image below.
When you have the circle lined up, crop the image using the Crop command in the Image menu.

Now is a good time to save (File, Save As...). Make sure not to overwrite the originals.
Step 3: Identify Corresponding Points
In order to match the two images, we will need to find the rotation between them. HDRShop can do this semi-automatically, but you will need to provide the coordinates
of two points (corresponding to the same features in the environment) in each mirrored ball image.
The easiest way to get these coordinates is to use the Point Editor, which is available under the Window menu (cancel out of the Panoramic Transform window if you have
it open). Once the Points window is open, Ctrl-clicking on an image will create a new point. You can also drag existing points around. For our purposes, we will need
two points in each image, positioned on the same features. In our example below, I've chosen the two light sources above either side of the altar.
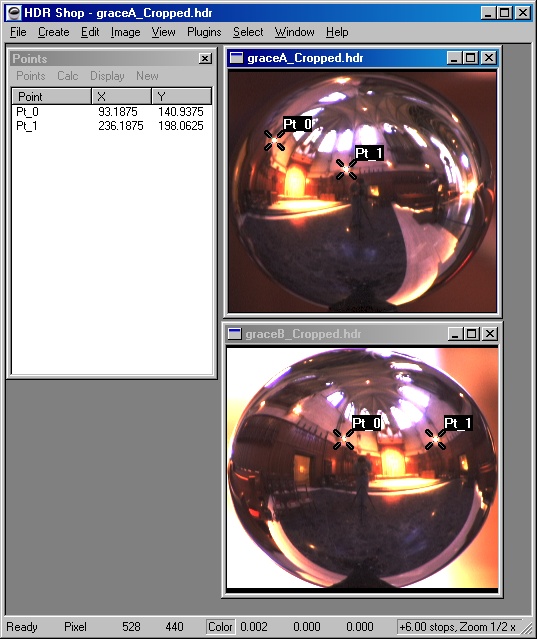
In the current public version of HDRShop, you need to write these coordinates down. (Future versions will allow you to use the points directly) In our example the coordinates are:
| x | y | |
|---|---|---|
| Image A: | 93.18750 | 140.93750 |
| 236.18750 | 198.06250 | |
| Image B: | 233.87500 | 186.12500 |
| 417.43750 | 187.56250 |
Now we can have HDRShop apply a 3D rotation to one of the panoramas in order to line it up to the other one, while simultaneously warping the images to the light probe (angular map) panoramic format.
To do this we will use the Panoramic Transform command. It can be found on the Image menu, under Spherical Transformations, Panoramic Transformations...
The source image should be the image you wish to unwarp. The destination image can be left as 'New Image'. Our source image format is 'mirrored ball', and we wish our destination
image to be in 'Light Probe (Angular Map)' format. You can change the destination image resolution to the desired size, and increase the supersampling if you want a better quality result.
In this case, we will warp image B with no rotation, and then warp and rotate image A to match image B. So we choose image B as our source image, select 'None' for 3D Rotation,
and click OK. This should produce a warped version of image B.
Now, going back to the Panoramic Transform dialog, we can set everything up again for image A. This time, select 'Match Points' under '3D Rotation'.
Clicking on 'Settings', we can enter in the coordinates we have written down:
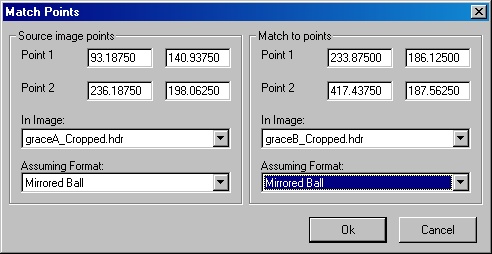
In this case, we have set it up to rotate image A to match image B.
Once all the fields are filled in correctly click OK for both Match Points and Panoramic Transform. You should now have two panoramas in light-probe format; something like this:
At this point you can turn off the points, either by deleting them or deselecting 'Show Points' from the Display menu on the Points window.
Step 5: Merge
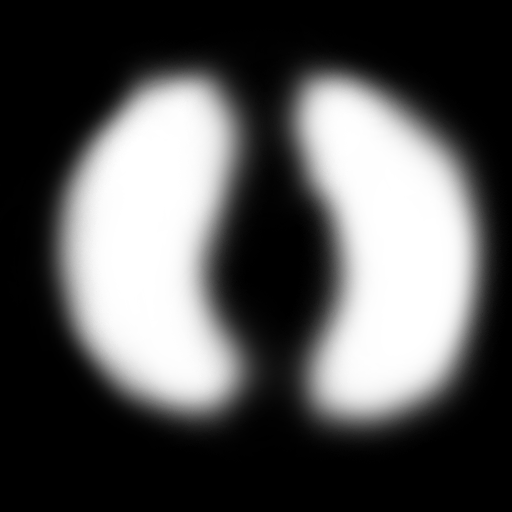
The final step is to merge these images together. For this we will need a mask: an image whose pixels are 0 where we wish to use image A, 1 where we wish to use image B,
and an intermediate value when we wish to blend between them. You can create a mask in any paint program, though Adobe Photoshop has some nice features that make it easier.
If you are familiar with Photoshop, save out JPEG versions of our two panoramas and load them into Photoshop. You can copy/paste one panorama as a layer on top of the other one,
and then add a mask to that layer. This way, as you paint on the mask you can see the result visually. If you don't have Photoshop, you'll just have to draw a mask and try it.
When you have a good mask, save the mask out as a Windows BMP, TIFF, or other uncompressed format that HDRShop supports.
The completed mask should look something like this:

You can download this mask here: mask2.bmp
Next load this mask into HDRShop. To merge the two panoramas using the mask, choose Calculate from the Image menu, and choose the values like so:
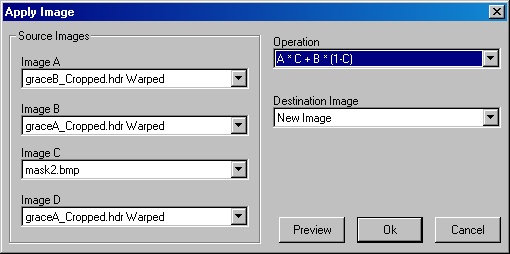
This does an alpha blend between image B and image A using the mask.
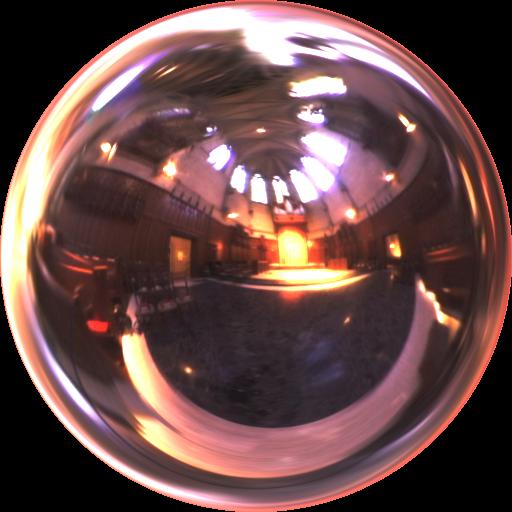
The result of this is your finished light probe! The two cameras and the regions of bad sampling have been removed, and it is ready to use as an illumination environment.
HDRshop can perform a diffuse or specular convolution on a high-dynamic range 360 degree panoramic image (also called a light probe). This is useful if you need to pre-compute a diffuse or rough specular texture map; for example, to light an object using a light probe in real time applications. The light probe must be in latitude/longitude format; see this tutorial on how to convert between various panoramic formats. Each pixel is replaced with the cosine-weighted integral of the corresponding hemisphere of incident illumination. In non-mathematical terms, the diffuse convolution is the image you'd want to use as an environment-map (indexed by the surface normal) to light a diffuse object in order to show it lit by a light probe. The specular convolution is the image you’d want to use as an environment map (indexed by the reflection vector) to light a rough but shiny object. It may be good to downsample the environment image first since the convolution calculations can take quite a long time. For a little more info see the reflection mapping web page.
| Original | Diffuse Convolution | Specular convolution | ||
|---|---|---|---|---|
| Phong Exponent: | 1.0 | 50.0 | 100.0 | |
| Image: |  |
 |
 |
 |
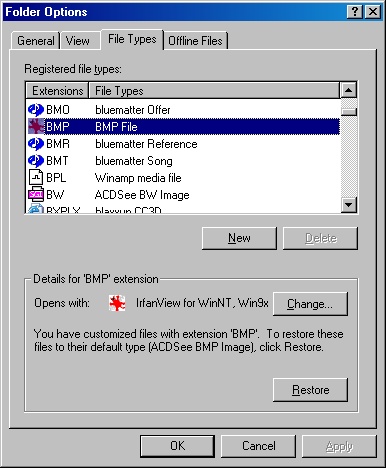
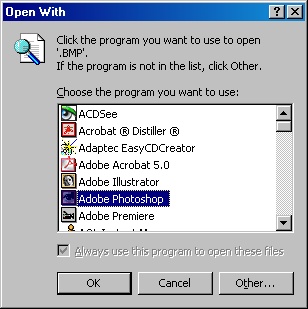
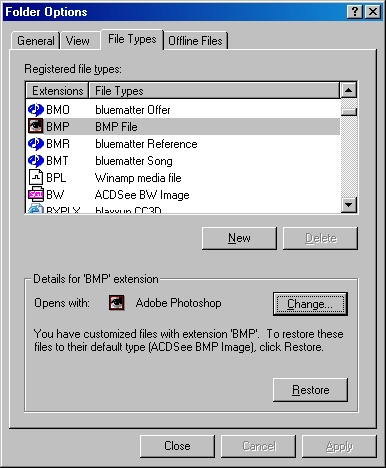
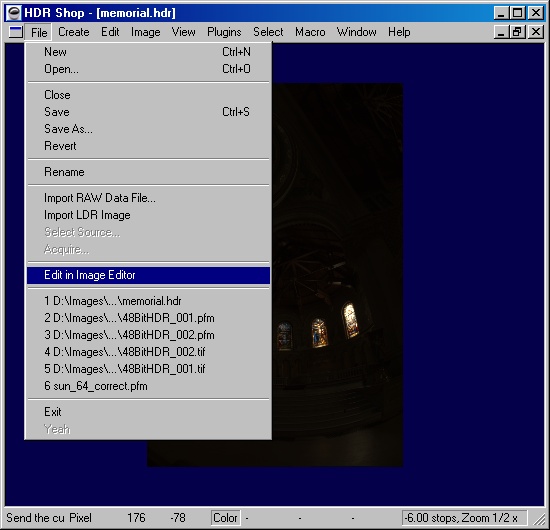
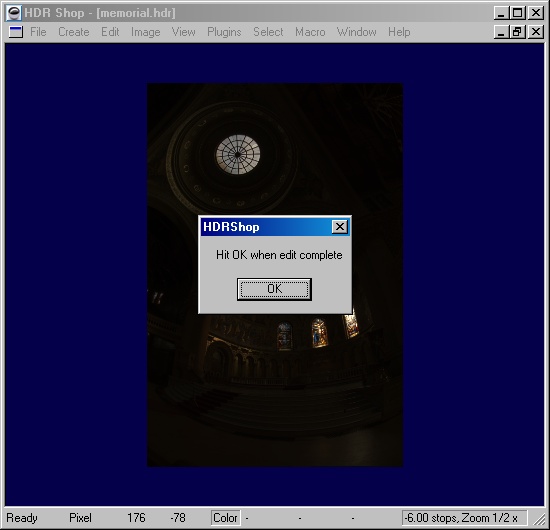
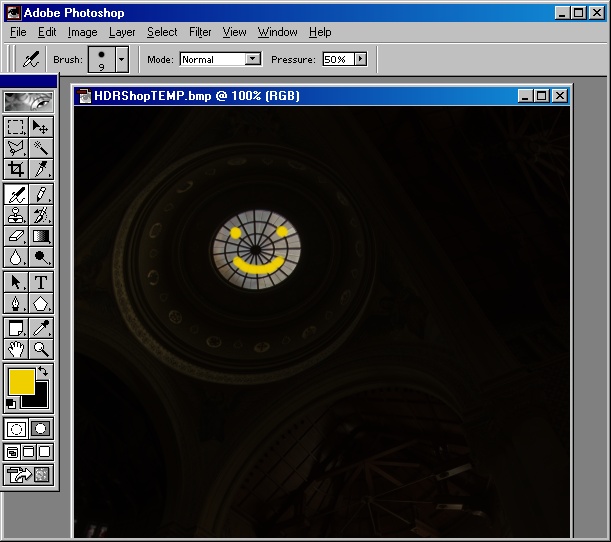
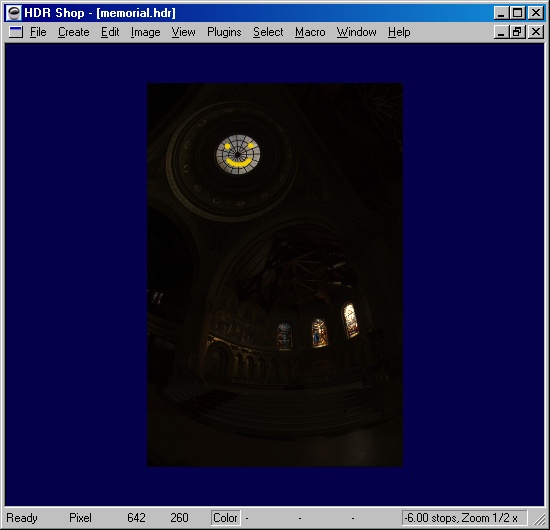
HDRShop has no image editing tools. However, it is possible to edit HDR images using traditional LDR image editors.
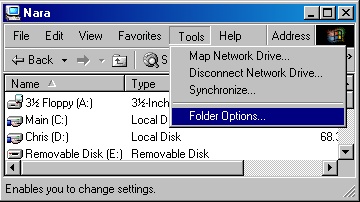
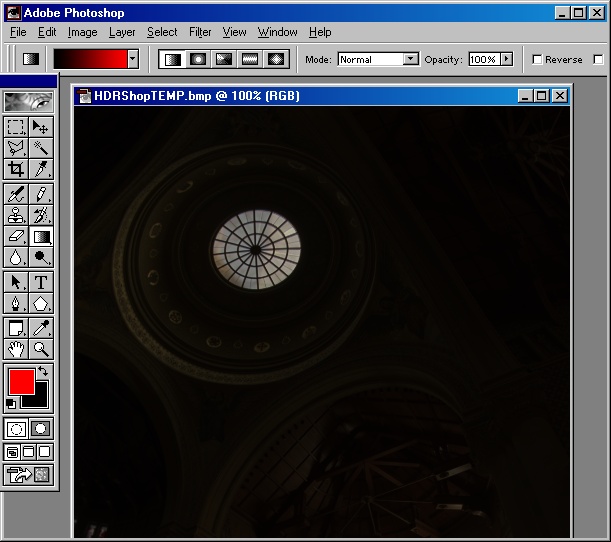
First, we need to choose the image editor we wish to use. In the current version of HDRShop, the only way to change the editor
that is launched automatically is to change the file extension association for .BMP files from within Windows Explorer.
To do this, go to an explorer window, and choose 'Folder Options' from the Tools menu.'


Using an HDR Shop plugin is simple. First, download the .exe file for the plugin and place it the "plugins" directory of HDR Shop.
(If this directory doesn't exist, create it in the same directory as your hdrshop.exe executable.)
The next time you start HDR Shop, it will scan for plugins in this directory and list the new plugin that you have installed.
(If you already have HDR Shop open, select "Rescan Directory" under the "Plugins" menu to cause it show up in the menu.)
Next, open an image in HDR Shop and perform any processing on it you wish to perform, and then select your desired plugin from
the Plugins menu. HDR Shop will query the plugin to find out its info and parameters and then bring up a dialog box listing the
plugin's help file and parameter inputs. Enter the desired values for the plugin parameters (Such as blur width, or a special
output filename). Then press the "Execute" button. The image will be written to a temporary .pfm file and the plugin will be
called on to process the image from disk (thus, make sure that you have enough free disk space for the input and output images
to be written.) If the plugin reports success, click OK on the dialog box. If the plugin produces an output image, it will then
be loaded automatically into HDRShop. The plugin dialog box will stay active so that you can run it again on the same input
image with different parameters. Close the window when you're through.
The HDR Shop Plug-in architecture is designed so that plugins can also be used as stand-alone programs. If you have HDR images
stored in the .pfm file format, feel free to run the plugin to process the file from the command line (or from a batch file)
directly. For example:
Note that this section requires knowledge of C or C++.
HDR Shop supports a flexible plug-in architecture that lets a user write a new image editing operation and integrate it with the
HDR Shop interface. Plug-ins are special stand-alone command-line programs that receive parameters via the command-line arguments.
Because the interface with HDR Shop uses command-line arguments and the standard pipes, a plug-in can be written in any language
and perform arbitrary processing on an image. For this tutorial, we will assume the language of choice is C++.
We will illustrate how to write a plug-in with a simple example plug-in that blurs an image and optionally halfsizes the image as well.
The plug-in communicates with HDR Shop via the stdin stream. When the plugin is invoked with a single command-line argument "--help" or
"/?" it must output its list of parameters in a specific format and then exit.
Our plug-in will output the following message to stderr:<
This is a simple test plugin to blur an image.
HDR ShopFLAGS:
HDR ShopVERSION: 1.0.1
USAGE: sample_plugin [input.pfm] [output.pfm] [options]
OPTIONS:
/V:[int=10]  		Blur Variance
/D			Downsample 50%
The plugin must list information about itself in the following blocks:
Options are specified one per line. Each option has an identifier string, an optional parameter descriptor, and a description string.
Each line should begin (ignoring whitespace) with an identifier string. For example, "/V:" and "/D" are the identifier strings in our
sample plugin. The identifier is terminated by either whitespace or a parameter descriptor. This gives us a little bit of leeway as to
how we want to specify our options; if we wanted, we could instead use "--variance=", or "-downsample" as identifiers.
Parameter descriptors are enclosed in square brackets: [], except for a multiple-selection, which is surrounded by curly braces: {}.
Inside the square brackets is the descriptor type, followed by an optional default value. If a default value is specified, then HDR
Shop will initialize the option's generated user interface to that value.
The available parameter descriptor types are:
| Type | Descriptor | Default | Example (identifier + descriptor) | Notes |
|---|---|---|---|---|
| boolean | false | /downsample | If this option is present on the command line, the value is true, otherwise false | |
| integer | [integer=X],[int=X] | X | --iterations=[int=6] | |
| string | [string=X],[str=X] | X | /greeting:[string=Hello World!] | |
| float | [float=X] | X | /pi=[float] | In all cases, if the user specifies no value for an option, that option is not sent as a command-line argument. |
| input filename | [inputfilename=X] | X | /C:[inputfilename=my default.cfg] | Specifies a file that the plugin will read |
| output filename | [outputfilename=X] | X | /debugout=[outputfilename=debug.txt] | Specifies a file that the plugin will write |
| rectangle | [selection] | See notes | /s[selection] | The user-interface for this option is a checkbox, defaulting to checked. When checked, the current selection in HDR Shop will be sent to the plugin, in the format: 100,100,200,200 (that's top,left,bottom,right). If there is no selection, the size of the entire image is returned |
| multiple choice | {String1|String2|...|StringN} | String1 | --algorithm:{|fast|accurate|weird} | Multiple selection from the given list of strings. The first value is the default. |
When the plugin is selected by the user, HDR Shop will execute "sample_plugin --help" and parse the resulting text. HDR Shop will then
create a dialogue box where the user can enter the values of all the plugin options. When the user has selected the options and clicks
"Execute," HDR Shop will call the plugin again, this time with all of the options packaged as command line arguments. Options are passed
to the plugin in the same format they are specified above. For example, if the user selects a "Blur Variance" value of 15, HDR Shop will
pass the command-line argument /V:15. If the user has selected the "Downsample" option, HDR Shop will pass the argument /D,
otherwise it will leave off the argument.
For plugins that manipulate images, HDR Shop passes them as .pfm files. See below for details on how to parse these files. HDR Shop writes
the current image to a temporary .pfm file, which it passes the plugin. If the plug-in is supposed to return in image to HDR Shop, HDR Shop
specifies the name of the temporary file that the plugin should save the .pfm file to.
Now lets get to the actual source code for the plugin:
int main(int argc, char *argv[])
{
	char *inputfilename = 0;
	char *outputfilename = 0;
	int downsample = 0;
	int variance = 10;

	if (argc == 1)	{
		printHelp();
		exit(0);
	}

	for (x = 1; x < argc; x++) {
		if (argv[x][0] == '-') {
			if (argv[x][1] == '-') {
				if (strncmp("help", &argv[x][2], 4) == 0) {
					printHelp();
					exit(0);
				}
			}
		}
		else if (argv[x][0] == '/') {
			switch(argv[x][1]) {
			case '?':
				printHelp();
				exit(0);
				break;
			case 'V':
				variance = atoi(argv[x]+3);
				break;
			case 'D':
				downsample = 1;
				break;
			}
		}
		else  {
			if (inputfilename == 0)
				inputfilename = argv[x];
			else
				outputfilename = argv[x];
		}
	}
	...
This section parses the command line arguments. If the program is passed /? or --help, it calls printHelp() which prints the message detailed
above to stderr and then exits. Otherwise, the program looks for the forward-slash flag to indicate command line options. If the option is ?,
it prints the help message. Otherwise, if the option is V, it parses the remaining part of the string for the integer value of variance. If
the option is D, it sets the downsample flag to true. Finally, if the command line argument is not an option, it is assumed to be the input filename.
If the input filename has been read, it is assumed to be the output filename.
if (!inputfilename)
			doError(1);
		if (!outputfilename)
			doError(2);

		floatimage fimg;
		if (!fimg.LoadPFM(inputfilename))
			doError(3);

		fimg.fast_gaussian_blur(variance);
		if (downsample)
			fimg.halfsize();

			if (!fimg.SavePFM(outputfilename))
				doError(4);

			return 0;
		}
The function doError() just prints an error string to stderr and then calls exit() with a nonzero value to indicate to HDR Shop that an error occurred.
HDR Shop will display everything that was output to stderr to the user as an error message. The floatimage class is a utility class. It provides a number
of useful functions like file i/o from various formats, antialiased pixel reads, bluring, convolution, and other utilities. The full source code for
floatimage and this sample plug-in is availible for download.
Once the plug-in has been compiled into a working executable, it must be placed in a subdirectoy called "plugins" that is in the same directory as the
HDR Shop executable. The name of the plug-in will appear in the plugins pulldown menu.
HDR Shop offers scripting capabilities that allow you to automate repetitive image manipulation tasks, and add your own custom functions. While some basic programming knowledge will help with this tutorial, we will not try to cover the basics of programming or Javascript as there are many other tutorials available online to teach basic JavaScript programming. (external link). Even if you have no programming experience, you may be able to easily modify some of the sample scripts to optimize your HDR Shop workflow.
Tutorials
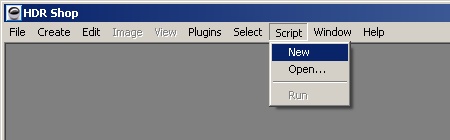
To create a new script, select New from the Script menu. This will open a new text window.
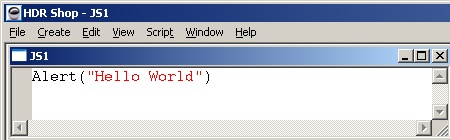
Once a script window is opened the menu will change to offer new text options such as search and replace. We will start with classic Hello World
application. Simply type the following code:
Alert("Hello World")
It should look like this:
To run the script select Run from the Script menu (or hit 'F5').
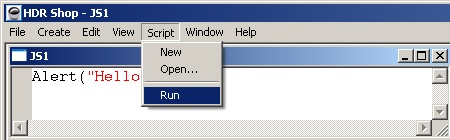
This should pop up a small window with the message "Hello World".

The script can be downloaded here.
Another way to run scripts is using the Script Browser. This is a dockable browser window that displays all the scripts in the HDRShop 'scripts'
directory. By double-clicking on a filename you can quickly open a given script.
HDR Shop scripting is based on the Spidermonkey Javascript engine (external link) developed by Mozilla. This provides all the basic Javascript
capabilities such as looping, conditional operators, variable, and functions. Just as a web browser provide specific functions for interacting
with web pages, HDR Shop provides custom functions and objects that allow for HDR image manipulation. Most of these functions are available
through the Image class which represents an HDR image. In this tutorial we cover how to first create an image.
To create a new image, you use the standard contructor. You pass it the dimensions of the image. In this case the width is 640, the height is 480.
var img = new Image(640,480);
You can also gain control of an existing image using the GetImage function. You pass an image index where 0 corresponds to the first image opened.
var img = GetImage(index);
Similarly GetActiveImage returns a pointer to the current active image or undefined if no image is selected.
var img = GetActiveImage();
To load an image from a file.
var img = LoadImage(filename);
Or you can save an image.
image.Save(filename);
An image has three properties Width, Height, and Pathname. These provide the basic infomation about the image. If the image has no associated file on disk, then the Pathname will be undefined.
So here is a script that demonstrates basic image handling.
img = new Image(640,480); // create a new image
img.Randomize(); // fills the image with random pixels
img.Save("foo.pfm"); // save the image
img.Close(0); // force the image to close
Sleep(1000); // wait a second
img = LoadImage("foo.pfm"); // load the image back in
// display image properties
Alert("Width = " + img.Width + "\nHeight = " + img.Height);
As Javascript does not have build in matrix, vector, color types, HDR Shop has some custom macros for quickly generating these types and passing them to functions.
rotateX: x
rotateY: y
rotateZ: z
matrix:[1, 0, 0, 0, 1, 0, 0, 0, 1]
The main use of HDR Shop scripts is to apply image operations to multiple images. The simplest version of this is to apply an operation to all the open images.
Here is a sample script for applying a 2 pixel Gaussian Blur to all open images.
var img;
for(i = 0; i < GetImageCount(); i++)
{
		img = GetImage(i);
		img.GaussianBlur(2);
}
Instead of gaussian blur there are many other operations that you can use. Here is a partial list of available functions in the Image class. The full list of HDR Shop scripting commands can be found in the file '#commands.txt' in the scripts directory (or double click the file from the script browser window).
bool Save(filename, (opt) format)
Image Duplicate()
void Copy(img)
void Close(force)
void Resize(width, height, (opt) options)
void Crop(left, top, width, height)
void Clear(r, g, b)
void Scale(r, g, b)
void Offset(r, g, b)
void Exp(r, g, b)
void Power(r, g, b)
void ThresholdLower(r, g, b)
void ScaleAdd(img, r, g, b)
void ApplyColorMatrix(mat)
void Add(img)
void Mult(img)
c[] Sum(left, top, width, height)
void GaussianBlur(sigma)
void MotionBlur(angle, pixels)
void StarBlur(params)
void Pan(x, y)
void FlipVertical()
void FlipHorizontal()
void Rotate90CW()
void Rotate90CCW()
void Vignette(inner, outer)
void Randomize()
void Quantize()
void Convolve(img)
In general whenever a function can be passed a r g b color value such as for Clear or Scale, the function can also be passed a 3 element array that contains the floating point color values. In the above code the size of the blur is hard-coded as two. To make the code more generic it would be nice to get some form of user-input to change these values. This is the subject of the next tutorial.
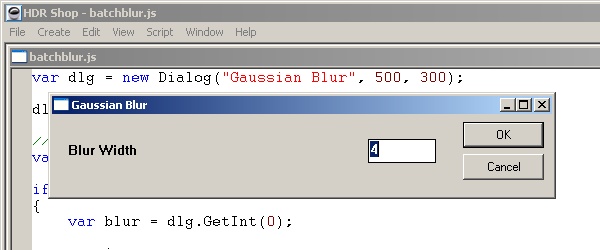
In order to make more reusable batch processing scripts, you need to get some form of user-input. While there are many for options for this, one convenient way is through HDR Shop window functions. In this tutorial we will extend the batch-processing script from the last tutorial to take a user-defined blur width. Here is the full modified batch script:
var dlg = new Dialog("Gaussian Blur", 500, 300);

dlg.AddInt("Blur Width", 4);

// display the dialog and wait for the user to press OK or Cancel
var result = dlg.DoModal();

if(result == 1)	// if the user pressed OK
{
		var blur = dlg.GetInt(0);

		var img;

		for(i = 0; i < GetImageCount(); i++)
		{
				img = GetImage(i);
				img.GaussianBlur(blur)
		}
	}
This should display a window with one integer parameter. Once the user presses OK the script retrieves the blur width, and batch processes all open images.
This script can be downloaded here.
Basically HDR Shop has a Dialog object that represents a generic dialog box. The constructor takes a name, width and height.
var dlg = new Dialog("Gaussian Blur", 500, 300);
We can then add interface components to the dialog. There are two types of components: Parameters and Behaviors.
Each parameter has one or more corresponding values that the user can set and which you can later retrieve such as a number or string.
Each parameter is assigned an identifying index based on the order they are added (the first parameter is zero, the second one, and so on),
these are used whenever you want to reference a given parameter. The current available parameter types are static text, check Box, floating
point number, integer, string, choice menu, panoramic format menu, image menu, file menu. To add a parameter to the dialog you use
one of the following member functions of Dialog:
void AddStatic(name)
void AddCheck(name, initial_value)
void AddFloat(name, initival_value)
void AddInt(name, initial_value)
void AddString(name, initial_value)
void AddChoice(name, inital value, choices)
void AddFile(name, initial value, openfile,  default extension)
void AddPanoramicFormat(initial_panoramic_index)
void AddImage(name, initial_image_index)
Behaviors are enforced rules/actions that relate multiple parameters.
An example of a behavior would be to make sure a width and height parameter combine to have the correct aspect ratio. To create a behavior
you need to provide the index of the involved parameters, and the desired behavior setting. These are set using the following Dialog member functions:
void EnsureAspectRatio
(index_of_width_parameter, index_of_height_parameter, index_of_checkbox, restore_on_click, rounding_offset)
void EnsurePanoramicAspectRatio
(index_of_width_parameter, index_of_height_parameter, index_of_checkbox, round_offset)
Now that we have designed our dialog, we need to display it. There are two different methods. Modal, and Non-Modal. A Modal call will display the dialog and waits for the user to press OK or Cancel. A Non-Modal call will display the dialog, then continue with the script. The corresponding member functions are:
				int DoModal()
				void DoNonModal()
For now we will assume that you display the window using DoModal. If the user selects OK then the DoModal function will return a value of 1.
The final step is to retrieve the parameter values. For this you call a function requesting the desired data type and provide the index of the parameter.
boolean GetCheck(index)
float GetFloat(index)
int GetInt(index)
string GetString(index)
string GetChoice(index)
For more advanced operations, you need to change individual pixels. Doing pixel by pixel operations in Javascript is significantly slower than the equivelent C code. However it gives you a lot more customizable control than the operations available as menu items im HDR Shop. To set pixels you use another member of the Image class which takes a x,y position (the origin is the top left pixel) and a rgb color as either three floats or a 3x1 float array.
void SetPixel(x,y,r,g,b);
void SetPixel(x,y,c[]);
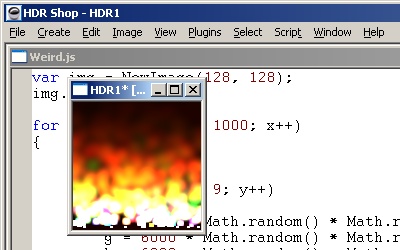
Here is a script that shows a more unconventional use of pixel operations to create an 1000 frame animation of a fire like effect.
var img = NewImage(128, 128);
img.Clear(0, 0, 0);

for (var x = 0; x < 1000; x++)
{
	img.Pan(0, -2);

	for (y = 0; y < 9; y++)
	{
		r = 6000 * Math.random() * Math.random();
		g = 6000 * Math.random() * Math.random();
		b = 6000 * Math.random() * Math.random();
		img.SetPixel(Math.random() * (img.Width - 1),127 r, g, b);
	}

	img.GaussianBlur(1);
	img.Scale(0.87, .81, .7);

	Sleep(20);
}
One of the most popular features of HDR Shop is the ability to easily convert between various panoramic formats. The basics of panoramic mappings
is covered in the tutorial - Panoramic Image Transformations. This scripts covers how to access and extend this same functionality through your scripts.
A panoramic transform is simply a pixel sampling operation that sets pixels values according to several popular image-mapping equations. This could be
implemented using just Javascript pixel access functions (mappings.js) but is extremely slow and is not recommended. Alternatively HDR Shop provides a
function for panoramic transforms as a member of the Image class.
void PanoramicResample(srcFormat, dstFormat, dstWidth, dstHeight, sampling, supersample, transform)
srcFormat and dstFormat are the integer id's of the the desired panoramic format. dstWidth and dstHeight represent the desired size of the destination
image. sampling is an integer indicating the sampling technique. tranfsorm is a string representing a 3d rotation that can be applied to the panorama.
The tranformation can be either a combination of axis rotations and/or a rotation matrix following this format.
Here is a script that runs a panoramic resample on a series of images in a directory: batchpanoramicresample.js
var dlg = new Dialog("Panoramic resample script", 700, 200);

var types = new Array("bmp","jpg","ppm","tga","tif", "hdr", "pfm");

dlg.AddStatic("INPUT SETTINGS"); // 0
dlg.AddString("Directory", "c:\\"); // 1
dlg.AddChoice("File type", 4, types[0] + "|" + types[1] + "|" + types[2] + "|" + types[3] + "|" +
types[4] + "|" + types[5] + "|" + types[6]); // 2
dlg.AddPanoramicFormat() // 3

dlg.AddStatic("OUTPUT SETTINGS"); // 4
dlg.AddString("Directory", "c:\\"); // 5

// this last line adds error checking so that the output panoramic format has the proper width and height.
dlg.EnsurePanoramicAspectRatio( dlg.AddPanoramicFormat(), dlg.AddInt("Width", 1024, 1),
dlg.AddInt("Height", 512, 1), dlg.AddCheck("Keep Aspect Ratio", 1)); // 6, 7, 8, 9
dlg.AddChoice("Sampling", 2, "Nearest neighbor|Bilinear|Bicubic"); // 10
dlg.AddInt("Supersample", 3); // 11

var result = dlg.DoModal(); // create the window (similar to the MFC style DoModal function)

if (result == 1) // if the user clicked OK, process images
{
	// get all files ending with desired extension
	var path = dlg.GetString(1) + "*." + types[dlg.GetChoice(2)];
	var filelist = System.Files(path);

	// get other parameters from dialog
	var newpath = dlg.GetString(5);
	var inputformat = dlg.GetPanoramicFormat(3);
	var outputformat = dlg.GetPanoramicFormat(6);
	var width = dlg.GetInt(7);
	var height = dlg.GetInt(8);
	var sampling = dlg.GetChoice(10);
	var supersample = dlg.GetInt(11);

	// iterate through the file names
	var processed = 0;
	while(processed < filelist.length)
	{
		var filename = filelist[processed];
		var img = LoadImage(filename);

		img.Rotate90CW(); // or use Rotate90CCW();
		img.FlipHorizontal(); // or use FlipVertical();

		// the optional matrix parameter allows you to apply a custom rotation during resampling
(I only include it so you know its there)
		var img2 = img.PanoramicResample(inputformat, outputformat, width, height,
sampling, supersample, { matrix:[1, 0, 0, 0, 1, 0, 0, 0, 1] }, {} );

		// change the path to the new output directory
		var newname = filename.replace(/^.*\\/, newpath);

		img2.Save(newname);

		Sleep(100);
		img.Close(1); // force the image to close
		img2.Close(1);

		processed++;
	}

	Alert("Processed " + processed + "  files ");

}
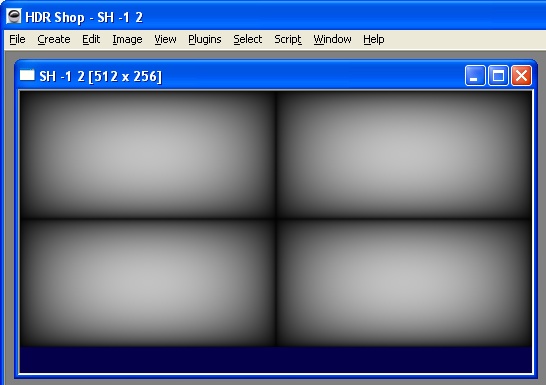
Spherical harmonics have many uses in comuter graphics from precomputed radiance transfer to data compression. While a detailed explanations of the math is beyond this tutorial, HDR Shop provides some basic functions that handle most of the math for you. HDR Shop can generate arbitrary spherical harmonics through Create->Spherical Harmonics menu option.
This function can also be called from within an HDR Shop script:
Image CreateSphericalHarmonic(M, L, width, height, format);
M and L represent the order of the desired harmonic, width and height represent the desired size of the destination image. format is the integer id of the the desired panoramic format. Once one can generate these spherical harmonic images, one can easily do simple operations such as spherical harmonic decomposition (factorSH.js) and diffuse convolution (sh_blur.js).
Sometimes the standard HDR Shop dialog control is not enough for more complex scripts. Some functions such as drag-and-drop can only be
implemented with custom ActiveX controls. As ActiveX can contain arbitrary user code, HDR Shop is not responsable for what happens inside
the control. The control is responsable for its own memory management and user interface.
To handle ActiveX controls, HDR Shop has a custom Javascript class called AXControl. To initialize the control one must pass the name of
the activeX control and a pointer to the HDR Shop window it will inhabit.
var wnd = new Window(); // create an empty window
var ax = new AXControl("FILEDROPPER.FileDropperCtrl.1", wnd); // create a control in this window
ActiveX controls generate arbirary events. To handle these HDR Shop defines a second helper event handler. Using this class, the user can map ActiveX scripts to Javascript functions.
var axe = GetEventHandler(ax);

// event handler
axe.OnFileDropped = function(filename)
{
  // do something
}
To see ActiveX controls in action try out hdr2ldr.js. This script uses the File Dropper control to generate a list of drag-and-drop files. HDR Shop assumes you already have the necessary ActiveX controls installed on your system otherwise the script will generate an error. While there are several ways to install controls, you can easily use the Regsvr32 command line program included with the standard Windows install. (Quick'n'Dirty: Just type 'regsvr32 FileDropper.ocx' from a Command Prompt in the HDRShop\plugins directory.)
Sometimes the standard HDR Shop dialog control is not enough for more complex scripts. Some functions such as drag-and-drop can only be
implemented with custom ActiveX controls. As ActiveX can contain arbitrary user code, HDR Shop is not responsable for what happens inside
the control. The control is responsable for its own memory management and user interface.
To handle ActiveX controls, HDR Shop has a custom Javascript class called AXControl. To initialize the control one must pass the name
of the activeX control and a pointer to the HDR Shop window it will inhabit.
var wnd = new Window(); // create an empty window
var ax = new AXControl("FILEDROPPER.FileDropperCtrl.1", wnd); // create a control in this window
ActiveX controls generate arbirary events. To handle these HDR Shop defines a second helper event handler. Using this class, the user can map ActiveX scripts to Javascript functions.
var axe = GetEventHandler(ax);

// event handler
axe.OnFileDropped = function(filename)
{
  // do something
}
To see ActiveX controls in action try out hdr2ldr.js. This script uses the File Dropper control to generate a list of drag-and-drop files. HDR Shop assumes you already have the necessary ActiveX controls installed on your system otherwise the script will generate an error. While there are several ways to install controls, you can easily use the Regsvr32 command line program included with the standard Windows install. (Quick'n'Dirty: Just type 'regsvr32 FileDropper.ocx' from a Command Prompt in the HDRShop\plugins directory.)
HDR Shop allows you to alter the pixel values in one image using the reference values in a different image. In this tutorial we will illustrate
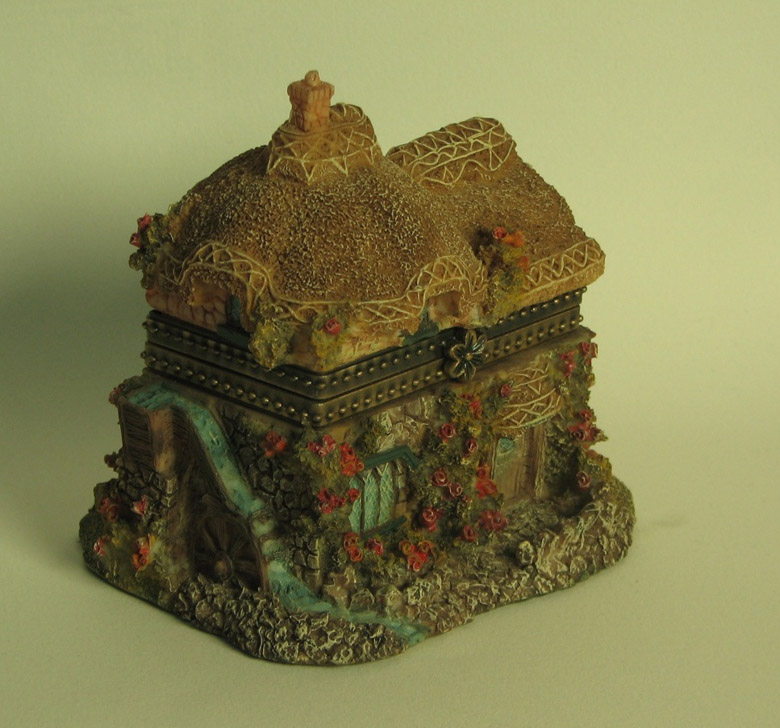
this process by balancing an image into sRGB color space using a standard 'Gretag Macbeth Color Checker' chart. A Macbeth chart is a non-reflective
arrangement of 24 colored squares chosen to represent commonly photographed subject types such as skin and blue sky.
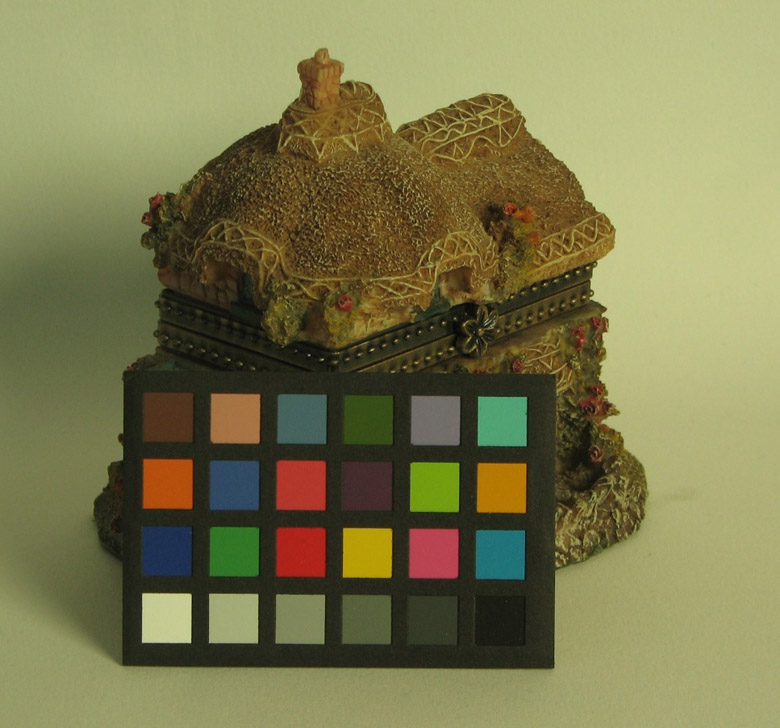
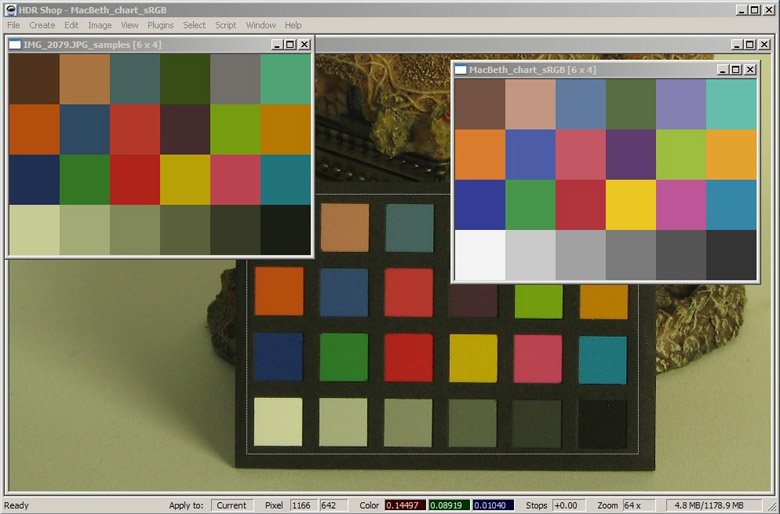
Below is our test scene taken under indoor illumination and through a light green filter (left). On the right is the same scene with a Macbeth chart.
To balance to a Macbeth chart, you need to have an image of the chart under the same illumination conditions that you wish to correct for.
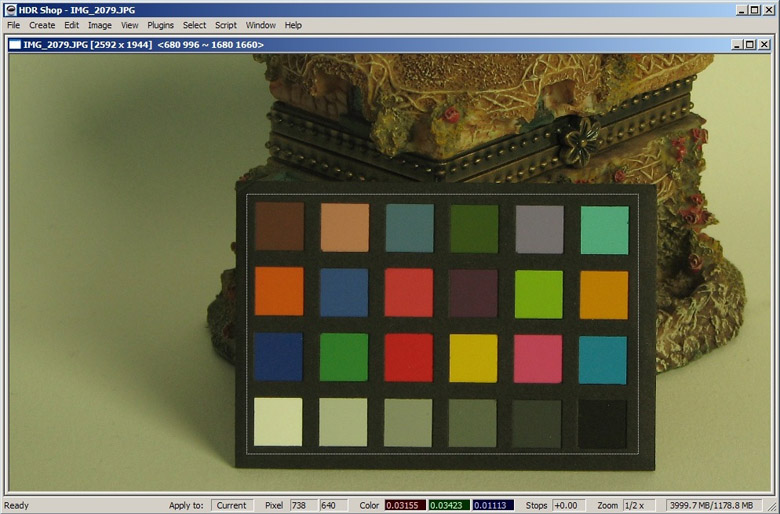
First, we need to sample what colors those 24 squares are in our scene. To do this, select a rectangular area containing the colored area of the chart
(you may need to rotate/rectify the images first in HDR Shop to get the chart edges roughly parallel to the selection rectangle):
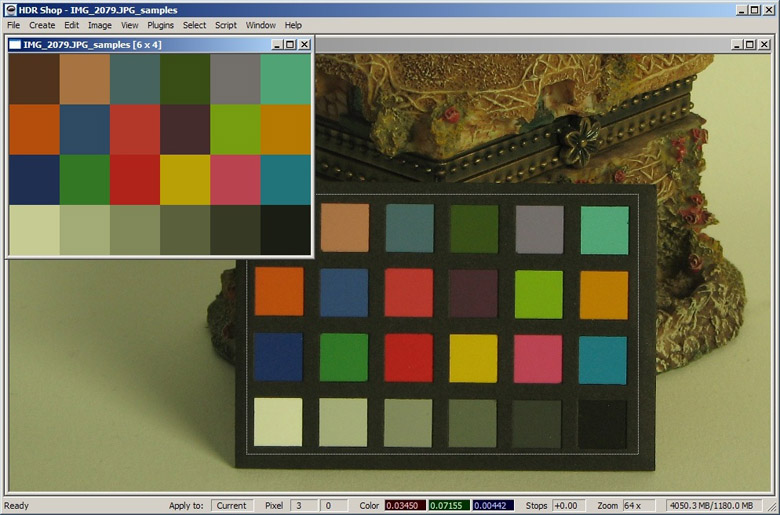
Now choose 'Image->Info->Sample Grid' from the menu. In the dialog that appears, enter the grid dimensions (24) and the number of samples (horizontally & vertically) to be taken from the center of each grid square. 10 samples in width and height will cause the 10 x 10 square in the grid square center to be used as the samples. The default 5 x 5 is usually enough for a well/uniformly lit scene. The mean value for each set of grid square samples is computed and output as an image with one pixel for each grid square with the value of the mean of the samples within the input grid:
Next, create a reference Macbeth chart in a color space into which the scene will be transformed. Select 'Create->Macbeth Chart...' from the menu and choose 'sRGB' from the 'color space' drop-down box. This creates a 6 x 4 pixel representation of a Macbeth chart in the sRGB color space:
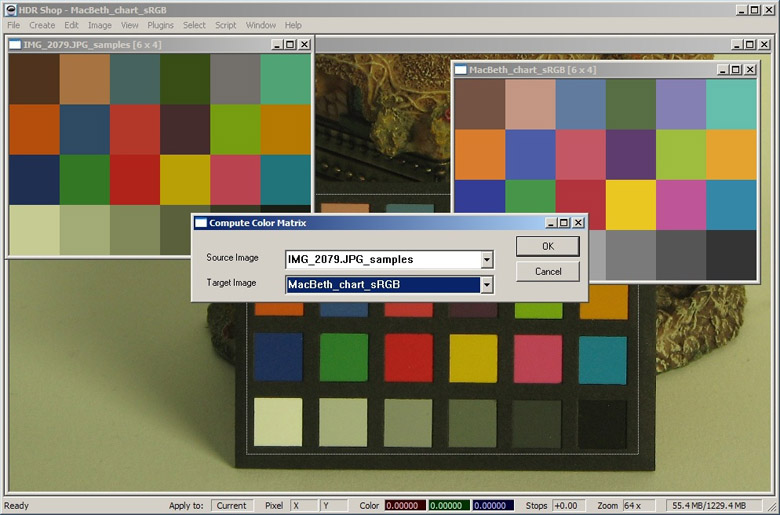
Now we need to compute the 3 x 3 matrix which maps color values in our sampled scene chart to our reference chart. Choose 'Image->Pixels->Compute Color Matrix...' from the menu. Select the sampled scene chart as the 'source image' and the reference chart as the 'target image' and click 'OK':
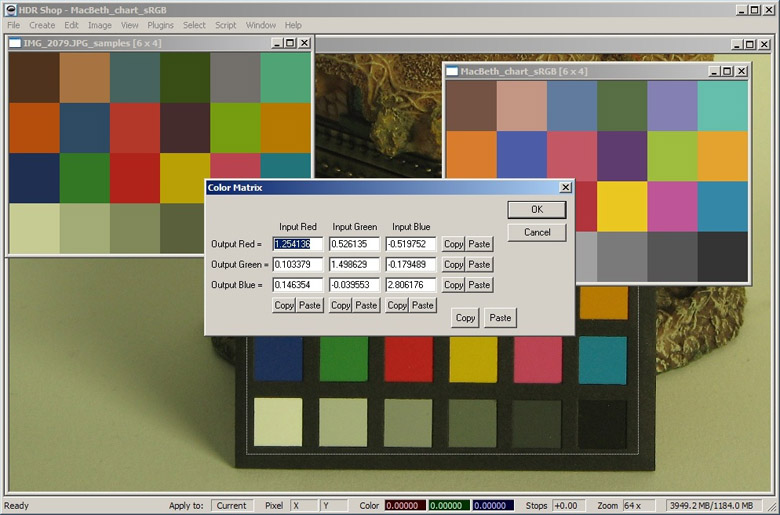
HDR Shop computes the transformation by creating a system of linear equations from each pixel channel. This system is then solved by finding the pseudo-inverse using SVD. the resulting 3 x 3 matrix is presented as a dialog. From here the matrix or constituent parts can be copied to the text buffer:
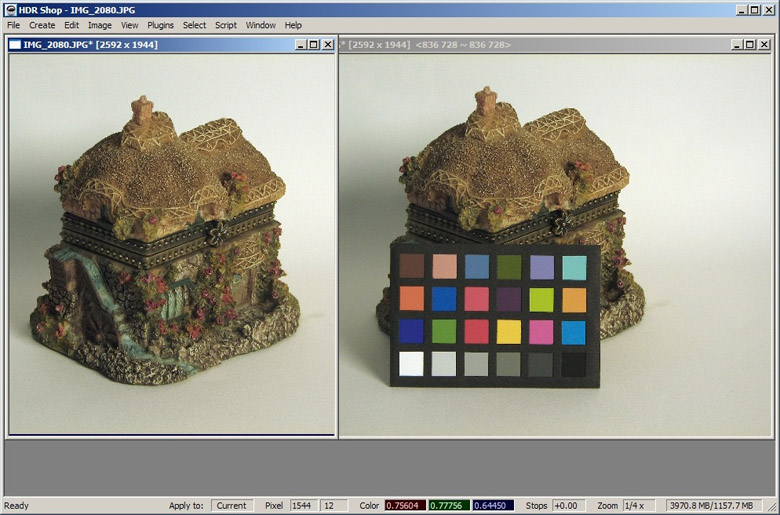
All we need to do now is to use the computed color matrix to transform the original scene images. Make sure to first deselect the rectangle around the Macbeth chart in the original image before applying the color balance. Select 'Image->Pixels->Apply Color Matrix...' from the menu. Paste the computed color matrix into the dialog and click 'OK'. The image colors are now transformed into sRGB color space and should now look a lot more 'natural'. You can now also apply the balance to any other images without the Macbeth chart:
Note that the 'Compute Color Matrix...' function can be used to compute changes between any pair of images (provided they are the same size) so the color transformation between images with the same content, but different illumination can be obtained. Also note that the new framework allowing an operation to be applied to any or all of the currently open windows (see the 'View->Apply to...' menu items) means that operations such as color balancing can be performed within HDR Shop without the need to write a script or repeat the operation for each image.
HDR Shop includes a useful facility which allows you to import virtually any proprietary digital camera manufacturer's native image files (commonly called 'RAW' files
although there is no single defined standard format as yet). To use the RAW importer, simply drag a RAW file onto the HDR Shop window (or use the 'File->Open' menu or
hit 'Ctrl+O'). RAW images have the advantage that they are (usually) linear in response and are HDR in the sense that the values are more than 8-bits and less than
16-bits per channel therefore they contain more information than a typical LDR image and are unaltered by color balancing or other post-capture software processes.
[Note: HDR Shop 2.0 allowed you to assemble a subset of Canon RAW images into an HDR image by opening multiple RAW files. Assembling HDR images in HDR Shop 3.0 is
done via the 'Create->Assemble HDR form Image Sequence' (HDR assembly tutorial) menu. If you open multiple RAW files in one go in HDR Shop 3.0 it reminds you of
this change of functionality once in every session as a courtesy to experienced users.]
The 'Raw Image Development Parameters' dialog appears displaying a report of the image parameters obtained from the EXIF information and the header:
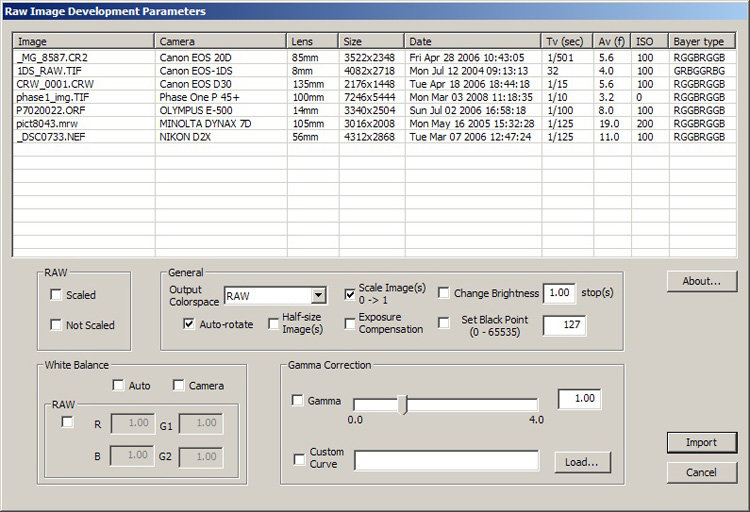
The dialog allows you to control how RAW images should be imported in 4 control areas.
Raw Controls
Checking either the 'Scaled' or 'Not Scaled' boxes causes the RAW image to be read as a monochromatic representation of the Bayer pattern. This is how the camera
sensor initially records the image in 3 or 4 separate colors before it is interpolated into a full color image. eg for a Bayer pattern of RGGBRGGB the monchrome
image is a repeating frid of 2 x 2 squares where the top left pixel represent the red channel, the bottom right represents blue and the other 2 pixels represent
green. RAW Bayer images contain the basic information to obtain the final full color image but are significantly smaller. You can perform the interpolation manually
via the 'Image->Filter->Bayer Interpolation' menu in HDR Shop.
Checking the 'Scaled' box scales the image from 0-65535 to 0-1. 'Unscaled' omits this process.
The imported images can be white-balanced in 3 ways:
Either choose a standard gamma curve or specify a custom profile. Note that RAW images are normally linear and do not require any gamma correction.
When you are satisfied with your choice of parameters, click 'Import'...
HDR Shop 3.0 includes a small but powerful command line batch processing utility called 'rawTool'. Offline batch processing can be used for 2 functions:
1) Conversion of multiple files from any of the following input formats:
To any of the following output formats:
2) Assembly of HDR images from image sequences in any of the above input formats output in any of the above output formats.
The command line utility is called 'rawTool.exe' and can be found in your HDR Shop directory in the \plugins\imgConvert\ directory.
If you open a command prompt and navigate to that directory and type 'rawTool.exe' you will be presented with the instruction list:
			  #==============================#  RAW converter built on...
			  | rawTool by Bruce Lamond 2008 |  Raw Photo Decoder "dcraw"
			  #==============================#  by Dave Coffin, [email protected]

			  Usage: 'rawTool [options] file1 [ file2 ...]'

				 HDR assembly options:
		-----------------------------------------------------------------------------
		-hdr                   Assemble HDR sequence from files.
		-hdr_no_exif           Assemble HDR without using embedded exif
		-range < num> < num>   Usable pixel values range 0-1 (default 0.005-0.92)
		-pd                    Load RAW images as 3-channel float (SLOW!!)
		-sc < num>             Set fixed abs scale multiplier between images in sequence
		-scRGB < num> <1 1 1 r2 g2 b2 r3...>  Set sequence abs scale per channel
						num:images in sequence; r:scale r/r"

				 Converter options for all image formats:
		-----------------------------------------------------------------------------
		-r/-R                  Recursively convert wildcard files in all subdirectories
		-crop < l>< r>< t>< b> Crop the image (left/right/top/bottom) before saving
		-h                     Half-size color image (simple 1-2-1 blur kernel)
		-h_same_name           Half-size: don't append '[h]' to output filename
		-ow                    Over-write output image if it exists (default: off)
		-o "outFile"           Specify output filename (single input file only)
		-g < num>              gamma correct (0-16)
		-gFile "fname.m"       apply custom gamma curve
		-b < num>              Change brightness (stops)
		-exp                   Exposure compensation (Av x Av) / (Tv x ISO)

				 RAW converter options:
				 (All RAW options valid with HDR assembly options)
		-----------------------------------------------------------------------------
		-no_map0_1             Don't scale 0-65535(ushort) to 0-1(float)
		-no_autorotate         Don't rotate image based on camera orientation sensor
		-wba                   Use automatic (average whole image) white balance
		-wbc                   Use camera white balance, if possible
		-rwb < nums>           Set raw white balance (four values required - R G1 G2 B)
		-sbl < num>            Set black point
		-H [0-9]               Highlight mode (0=clip, 1=no clip, 2+=recover)
		-t [0-7]               Flip image (0=none, 3=180, 5=90CCW, 6=90CW)
		-oc [0-5]              Output colorspace (raw,sRGB,Adobe,Wide,ProPhoto,XYZ)
		-bayer                 Document Mode (no color, no interpolation)
		-bayer_unscaled        Document Mode without scaling (totally raw)
		-q [0-3]               Set the interpolation quality (3 default)
		-f                     Interpolate RGGB as four colors
		-B < domain> < range>  Apply bilateral filter to reduce noise
		-j                     Don't stretch or rotate Fuji super CCD images

				RAW info options:
		-v                     Print verbose messages
		-c                     Write image data to standard output
		-e                     Extract embedded thumbnail image
		-i                     Identify files without decoding them
		-z                     Change file dates to camera timestamp

				 Valid output file types:
		-----------------------------------------------------------------------------
		-pfm                   Default 32-bit PFM
		-exr                   16-bit(HALF) OpenEXR zlib block compression (3)
		-rad                   32-bit HDR Radiance format
		-png                   8-bit PNG
		-jpg                   8-bit JPG
		-bmp                   8-bit BMP
		-ppm                   8-bit PPM
		-tga                   8-bit TGA
		-tif                   32-bit TIF
Notes:
* The 'HDR assembly options' are similar to those dialog options listed in the HDR Image Assembly tutorial.
* Most of the 'RAW converter options' are the same as the dialog options in the Importing RAW Images tutorial.
Example uses of rawTool.exe:
>rawTool -png -h IMG_0001.jpg IMG_0002.jpg IMG_0003.jpg- produces the files 'IMG_0001[h].png', 'IMG_0002[h].png', 'IMG_0003[h].png'. Note that rawTool automatically renames the files for you. You can exclude the '[h]' part of the filename with the '-h_same_name' option.
>rawTool -tif IMG_0001.CR2- produces the file IMG_0001.tif
>rawTool -hdr -exr IMG_0001.NEF IMG_0002.NEF IMG_0003.NEF- produces the file IMG_0001.exr. Note that the file gets named with the prefix of the first file in the list.
Drag and Drop shortcuts. Some predefined links have been included in the same directory to allow you to convert/assemble files
by dragging them on to the link directly, avoiding the command line. To enable these links you should do the following:
Create an Windows environment variable called 'IMGCONVERT' which points to the directory where rawTool.exe resides. Add '$IMGCONVERT$'
(note the dollar signs) to your Windows PATH. You can find information on how to perform these operations on the Internet.
You should be able to use the link now.
A simple batch file generator is also included in the same directory as rawTool.exe. This command line tool can be used to automatically
generate text files containing a very large number of custom commands. The tool is called 'batchGen.exe'. Type 'batchGen.exe' in the
command prompt to see the list of instructions:
#===============================#
| batchGen by Bruce Lamond 2007 |
#===============================#

Generate batch files quickly.

Usage: 'batchGen \
         -exe  \
         [-o <"list of options">] \
         -pfix  \
         -st <00..n> \
         -end  \
         [-step ]\
         -sfix  \
         [-opfix ]
         [-osfix ]
         [-out ]

Example:
  You want a batch file called 'convert.bat' with lines that read:

  rawTool.exe -png -h C:\temp\image0001.pfm
  rawTool.exe -png -h C:\temp\image0003.pfm
  ...
  ...
  ...
  rawTool.exe -png -h C:\temp\image0753.pfm

Command:
  'batchGen -exe rawTool.exe -o "-png -h" -pfix C:\temp\image \
  -st 0001 -end 0753 -step 2 -sfix .pfm -out convert.bat'

Note: multiple options or prefix locations with spaces must be
  enclosed in double quotes.
Notes:
* batchGen is a simple but incomplete utility principally for non-programmers! It is included to generate batch files for rawTool, but can be used for other applications with a little imagination.
* The start and end numbers must have the same number of digits. Pad the lower numbers with zeros.
* The -opfix/-osfix options allow you to change the location and filename of the output.
The rawTool utility is built around dcraw , the RAW image converter by Dave Coffin.
This tutorial explains how to sample a lighting environment image (eg light probe) into a chosen number of representative light sources using an area subdivision approach.
Choice of areas and light source positions and intensities are computed based on the distribution of energy in parts of the image. In this way, the light source position
and intensity most representative of each particular area is obtained. This is useful in rendering lighting environments where efficiency is paramount and a good
approximation to the full resolution environment will suffice.
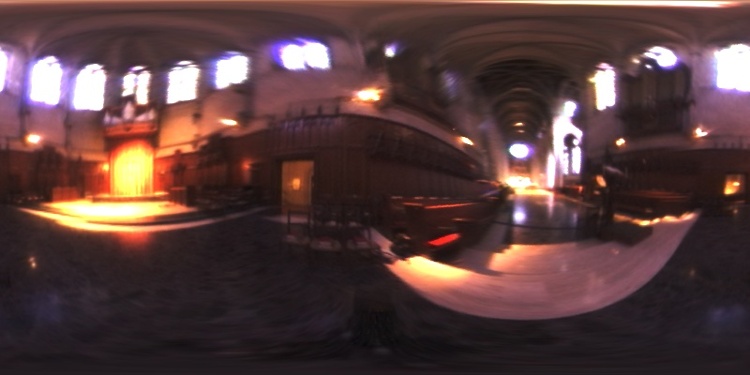
The first thing to do is to make sure that the light probe image is already in the correct panoramic format, in this case we require it to be in lat-long format. See this
tutorial for how to convert images between different panoramic formats. Now we need to run the sampling algorithm on the lat-long image. Activate the dialog via the menu
'Image->Spherical Transformations->Sample Light Probe Image to Light Source List'.
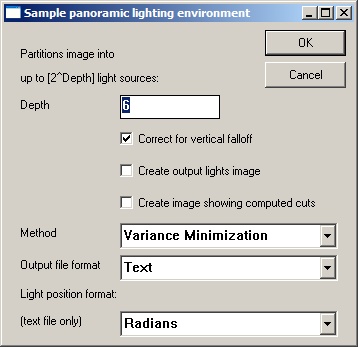
Here's what the various dialog parameters mean:
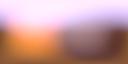
Now, let's load up an image and look at the output generated by sampling using the variance minimization technique. We use the familiar 'Grace Cathedral' High-Dynamic Range light probe image, already represented as a lat-long image:
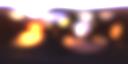
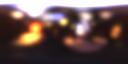
We then sample the image into 64 representative light sources:
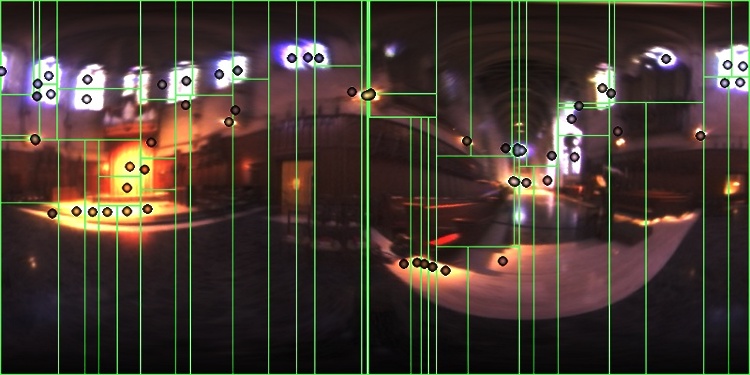
For this example we have obtained both the light source and 2D graph output images and made a visualization of a combination of all three in order to show the placement and color of all available outputs. Note how the sample positions correspond to the most representative position in each rectangular area in terms of energy distribution.