HDR Shop v3.0 User's Guide
Institute for Creative Technologies
Graphics Lab
Contents
- Getting Started.
- Introduction.
- Installation.
- HDR Shop 1.0 & 2.0 feature list
- What's New in HDR Shop v3.0 ?
- Getting Help.
- Credits.
- Reference Function List (by Menu)
- `File' menu
- `Create' menu
- `Edit' menu
- `Image' menu
- Size
 Half Size (Quick/simple)
M
Half Size (Quick/simple)
M
- Size
Half Size (Slower/accurate)
M
- Size
Double Size
M
- Size
Half Size X
M
- Size
Half Size Y
M
- Size
Arbitrary Resize...
M
- Planar Transformations
Rotate
 [R]
M
[R]
M
- Planar Transformations
Rotate
 M
M
- Planar Transformations
Rotate
 [Shift+R]
M
[Shift+R]
M
- Planar Transformations
Rotate Arbitrary...
M
- Planar Transformations
Flip Horizontal [H]
M
- Planar Transformations
Flip Vertical [V]
M
- Planar Transformations
Shift with Wrap...
M
- Planar Transformations
Shear...
M
- Planar Transformations
Rectify...
M
- Spherical Transformations
Panoramic Transformations...
- Spherical Transformations
Diffuse/Specular Convolution...
M
- Spherical Transformations
Ward Specular Convolution...
M
- Spherical Transformations
Fast Diffuse Convolution (Lat-Long)
M
- Spherical Transformations
Spherical Harmonic Reconstruct Lat-Long...
M
- Spherical Transformations
Sample Light Probe Image to Light Source List...
M
- Filter
Neighbor Average Blur
M
- Filter
Gaussian Blur...
M
- Filter
Bilateral Filter...
M
- Filter
Motion Blur...
M
- Filter
Horizontal Motion Blur...
M
- Filter
Circle Blur...
M
- Filter
Small Circle Blur...
M
- Filter
Star Filter
M
- Filter
Deinterlace
M
- Filter
Incremental Adaptive Unsharp Sharpen [^]
M
- Filter
Sharpen By... [Ctrl+6]
M
- Filter
Laplacian of Gaussian...
M
- Filter
X Derivative
M
- Filter
Y Derivative
M
- Filter
Gradient
M
- Filter
Corner Detect
M
- Filter
Edge Detectors
Gradient Based...
M
- Filter
Edge Detectors
Laplacian of Gaussian Based...
M
- Filter
Calculate Normals
M
- Filter
Interpolate Bayer Pattern...
M
- Filter
DCT (Discrete Cosine Transform)
M
- Filter
IDCT (Inverse Discrete Cosine Transform)
M
- Warp
Correct Lens Distortion
M
- Effects
Vignette...
M
- Effects
Randomize
M
- Effects
Sepia tone...
M
- Effects
Quantize
M
- Effects
Signed Quantize
M
- Effects
Vertical Cosine Falloff
M
- Pixel
Set/Clear...
M
- Pixel
Offset...
M
- Pixel
Scale...
M
- Pixel
Divide...
M
- Pixel
Power...
M
- Pixel
Exponentiate...
M
- Pixel
Log...
M
- Pixel
Replace Infinite/NAN...
M
- Pixel
Round
M
- Pixel
Floor
M
- Pixel
Ceiling
M
- Pixel
Desaturate
M
- Pixel
Scale to Current Exposure [Ctrl+0]
M
- Pixel
Clamp at Current Exposure
M
- Pixel
Normalize
M
- Pixel
Lower Threshold...
M
- Pixel
Upper Threshold...
M
- Pixel
Swap Byte Order [B]
M
- Pixel
White-Balance Selection
M
- Pixel
Scale Selection to White
M
- Pixel
Compute Color Matrix...
- Pixel
Apply Color Matrix...
M
- Pixel
Rasterize Triangle
M
- Pixel
Index Map
M
- Info
Max/Min/Average [I]
- Info
Copy Average [C]
- Info
Sample Grid...
- Crop M
- Calculate
- Duplicate [D]
- Size
- `View' menu
- Zoom In [Ctrl+
 plus
plus ]
M
]
M
- Zoom Out [Ctrl+
minus
]
M
- Center [(Numpad) 5] M
- Fit Window [Ctrl+(Numpad) 5] M
- Align All [A]
- Apply to Current Image [Shift+C]
- Apply to Multiple Images [Shift+M]
- Apply to All Images [Shift+A]
- Exposure
Stop Up [
plus
]
M
- Exposure
1/10 Stop Up [Shift+
plus
]
M
- Exposure
1/10 Stop Down [Shift+
minus
]
M
- Exposure
Stop Down [
minus
]
M
- Exposure
Stop All to Current [Q]
- Exposure
Reset to Zero [0]
M
- Exposure
Custom...
M
- Display Curve
Gamma 2.2
- Display Curve
Gamma 1.75
- Display Curve
Gamma 1.0
- Display Curve
Custom...
- Display Options
Negative Colors
Absolute Value
M
- Display Options
Negative Colors
Black
M
- Display Options
Negative Colors
Color...
M
- Display Options
Negative Colors
Offset Gray
M
- Display Options
Negative Colors
Negative
M
- Display Options
Saturated Colors
Normal
M
- Display Options
Saturated Colors
Color...
M
- Display Options
Channel Mask
Mask/Only Display Red [1/Ctrl+1]
M
- Display Options
Channel Mask
Mask/Only Display Green [2/Ctrl+2]
M
- Display Options
Channel Mask
Mask/Only Display Blue [3/Ctrl+3]
M
- Display Options
Channel Mask
Show All [Ctrl+
]
M
- Display Options
Precision (Decimal Places)
3 [Shift+3]
- Display Options
Precision (Decimal Places)
5 [Shift+5]
- Display Options
Precision (Decimal Places)
8 [Shift+8]
- Display Options
Precision (Decimal Places)
3 (Scientific Not.) [Ctrl+Shift+3]
- Display Options
Precision (Decimal Places)
5 (Scientific Not.) [Ctrl+Shift+5]
- Display Options
Precision (Decimal Places)
8 (Scientific Not.) [Ctrl+Shift+8]
- Display Options
Precision (Decimal Places)
uchar gamma corrected [Shift+U]
- Zoom In [Ctrl+
- `Plugins' menu
- `Select' menu
- `Script' menu
- `Window' menu
- `Help' menu
Getting Started.
Introduction.
What is HDR Shop?
Welcome to HDR Shop version 3.0! HDR Shop is an interactive graphical user interface image processing
and manipulation system designed for creating, viewing and processing High-Dynamic
Range images. HDR Shop also provides these same functions for all common low-dynamic range image types
(eg JPEG, BMP, PNG, TIFF) and allows almost every 'RAW' digital camera format to be viewed and
processed as a high-dynamic range image. HDR Shop allows you to perform many simple and complex
mathematical, filtering, and other useful image processing operations on single and multiple images with
floating point accuracy and readout through a simple but powerful user interface. The software also
supports scripting and is extensible via user-written plugins.
What is a High-Dynamic Range (HDR) image?
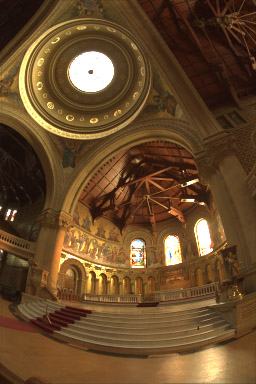
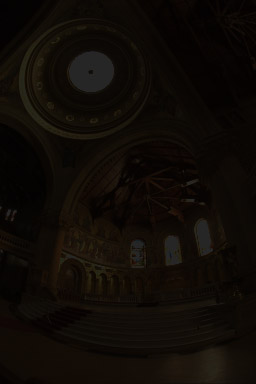
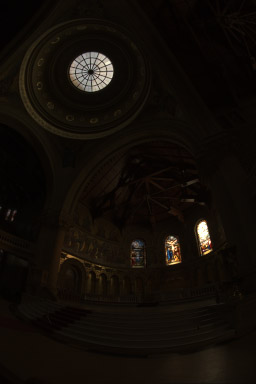
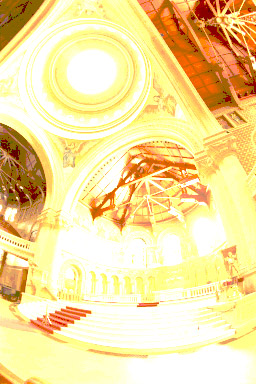
The "dynamic range" of a scene is the contrast ratio between its brightest and darkest parts. A plate of evenly-lit mashed potatoes outside on a cloudy day is low-dynamic range. The interior of an ornate cathedral with light streaming in through its stained-glass windows is high dynamic range. In fact, any scene in which the light sources can be seen directly is high dynamic range.
A High-Dynamic Range image is an image that has a greater dynamic range than can be shown on a standard display device, or that can be captured with a standard camera with just a single exposure.
HDR images also have the important property that their pixel values are proportional to the amount of light in the world corresponding to that pixel, unlike most regular images whose pixel values are nonlinearly encoded.
HDR Images are typically generated by combining multiple normal images of the same scene taken with different intensity levels, or as the result of creating a global illumination rendering. In practice, high dynamic range pixels use floating-point numbers, capable of representing light quantities of one to a million and beyond. Low-dynamic range images usually represent pixels using eight bits per channel, with pixel values ranging as integers between 0 and 255.
To see why HDR is a good thing, have a look at the table on the next page comparing a High-Dynamic
Range image to a normal 8-bit image.
How does HDR Shop work with high-dynamic range images?
Instead of storing a pixel's on-screen 'color', HDR Shop stores the amount of light (red, green and blue) it represents. Since there is no limit to how much light you can have in the real world, HDR Shop stores these pixel values as floating point numbers. That is, instead of storing pixels using the numbers (0, 1, 2, 3, 4, ... 253, 254, 255) like in an 8-bit image, it uses numbers like 0.01534, 0.9429, 1.0500, and 1.34538e+006.
HDR Shop can read and write high-dynamic range formats such as Radiance's HDR, 16-bit or floating
point TIFF, Portable Float Maps (PFM), and raw binary files. In addition, HDR Shop can import and
export conventional 8-bit image formats, including JPEG, Windows BMP, and TIFF. Though you don't
get any extra dynamic range from loading an 8-bit image into HDR Shop, you can still take advantage
of the extra precision and 'physically correct' image operations that 'standard' image editors don't
have.
Normal 8-bit Image |
High Dynamic Range Image |
| no operation added (normal view) | |
 |
|
| darken to 1/64th original brightness | |
 |
 |
| brighten to 32 times original brightness | |
 |
 |
| horizontal motion blur | |
 |
 |
Installation.
Installation of HDR Shop.
Licensed users should download a copy of HDR Shop v3.0 from the Website. The executable and associated files are bundled in a single .zip file.
** Please note that you will need 'administrator' rights in order to install HDR Shop on your
machine **
Simply create a folder where you want to install HDR Shop and unzip the contents of the zip file into
that directory. No further installation is required to use HDR Shop. You will see that 'plugins' and
'scripts' directories are created along with the executable.
Start HDR Shop by double-clicking 'HDRShop.exe'.
If you have not obtained a license key, you will not yet be able to use HDR Shop. A dialog box asking
for a license key to be entered will appear prompting you with a hardware ID associated with your
machine.
When you click the 'Submit' button on the dialog your default Web browser will open at our license
key-server Webpage. The following information must be filled out:
- Your hardware ID should already be filled out here but you should check that it matches the string in the dialog.
- Licensor's name (personal or company name).
- Your email address to return the license key to.
- The Order Number. This is a string of characters which is to be found in your 'receipt of purchase' email. If you cannot locate your order number, please email us giving us as much information about the transaction as possible.
Once you have filled out the Webform, click 'Submit' and your key should be generated instantaneously. A copy of the key will also be sent to the email address supplied. Copy the string of key characters and paste them into the registration dialog box in HDR Shop. You must restart HDR Shop but should now be able to use it. If you experience any problems, please email us.
Configuration for using command line tool.
The plugins
HDR Shop 1.0 & 2.0 feature list
Feature list from HDR Shop v1.0 & v2.0. See ' - What's New!' links to where these features have been improved in HDR Shop v3.0 .- Multi-threaded queuable architecture
- What's New!
HDR Shop 2.0 implemented multi-threaded operations. Multi-threading significantly speeds up work-flow. Multiple image operations run simultaneously. Sequential operations are queued to avoid resource conflicts. The program should never 'lock up' when busy. Most operations have progress bars to indicate the current status.
- JavaScript Scripting Interface
- What's New!
HDR Shop 2.0 integrated a JavaScript scripting interface. Scripting integrates the the power of the internal HDR Shop engine to your own custom operations and plug-ins. Basic HDR Shop functionality such as loading and saving images, filters and transforms are all exposed as JavaScript functions. More advanced scripting plug-ins can be developed by incorporating ActiveX controls, custom windows, and event handling.
- Batch Custom HDR Image Processing
- What's New!
HDR Shop 2.0 scripting also automated repetitive or complex image operations. Simple scripts can be used to apply the same operation to multiple images, assemble multiple HDR image sequences, and automatically load and save the processed images.
- Custom File Format Plugins
- What's New!
HDR Shop 2.0 could easily be expanded to support new file formats using dynamically loaded file libraries. Included with the distribution were two examples of file plug-ins, for Industrial Light & Magic's OpenEXR file format, and the Canon RAW file format.
- Support for OpenEXR images
HDR Shop can now load and save the OpenEXR HDR file format developed by Industrial Light & Magic via a plug-in included with version 2.0. The OpenEXR format is documented at http://www.openexr.net.
- Load RAW images
- What's New!
HDR Shop 2.0 can load and process digital camera RAW files. Directly using digital camera RAW files can proved highest quality images for HDR image processing. RAW files are both uncompressed and often have greater dynamic range than JPEG files. The HDR Shop 2.0 plug-in for RAW images imports the full 12bit dynamic range of Canon RAW image, while providing control over interpolation and processing. The plug-in has been tested with the Canon D30, D60, 10D and 1DS. Support for other RAW file formats is also included, though they have not been fully tested.
- HDR Assembly direct from Canon RAW images
- What's New!
HDR Shop 2.0 can load an HDR sequence of RAW images directly as an HDR image. The plug-in takes advantage of the file metadata to compensate for changes in shutter speed and aperture.
- HDR Copy and Paste
HDR Shop 2.0 can copy and paste high dynamic range image regions.
- Parameter Copy and Paste
HDR Shop 2.0 can copy and paste numerical values from pixel operations. This eliminates having to copy measurements by hand.
- Spherical Harmonics
HDR Shop 2.0 can generate spherical harmonic test patterns in any panoramic format.
- Panoramic Direction Table
HDR Shop 2.0 can generate a directional lookup table for any panoramic mapping.
- Registry Preferences
HDR Shop 2.0 has user-modifiable settings for specifying the external LDR image editor and file format.
- New math operations
HDR Shop 2.0 offers additional mathematical operators for analyzing and modifying images including constant addition, division, exponentiation, logarithmic math, color matrices, and normalization.
- New image filters
HDR Shop 2.0 offers additional image filters including:
- Star (lens-flare) Blur
- Motion Blur
- Ward Specular Convolution (approximation)
- Vertical Cosine Falloff (useful for weighting lat-long panoramas)
- Fast Diffuse Convolution (SH-based)
What's New in HDR Shop v3.0 ?
- Improved user interface
New GUI features: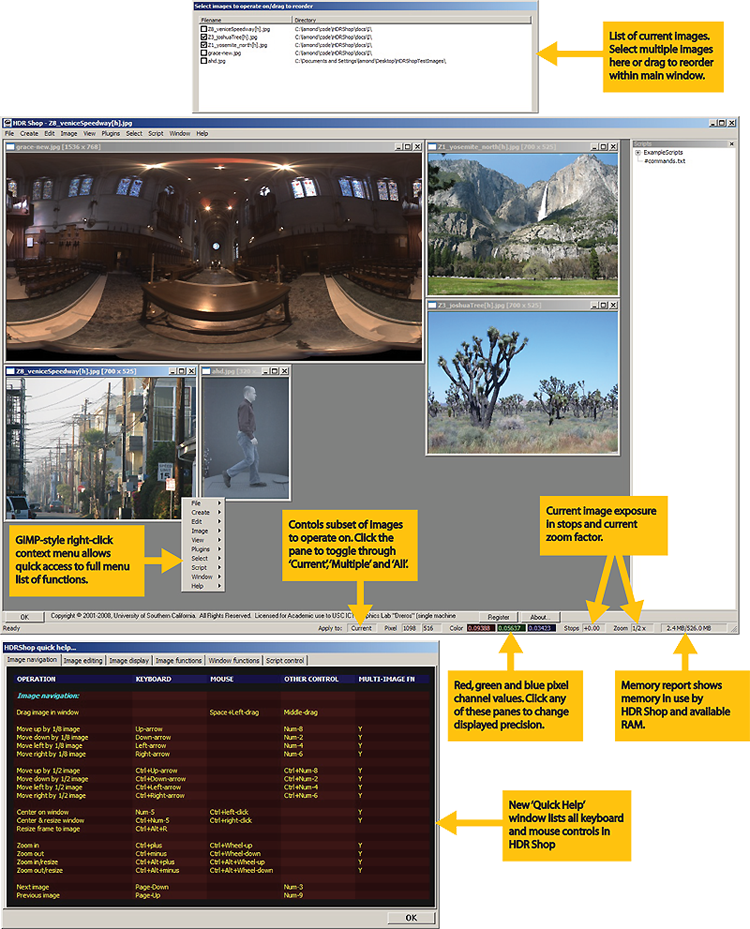
- Color-coded pixel channel display:
The display of pixel channel information can be altered to display values with 3,5 or 8 decimal places or in scientific notation by clicking on a colored pane, or pressing 'Shift+3/5/8' or 'Ctrl+Shift+3/5/8' for scientific notation, or from the menu by 'View
Display Options
Precision
'
- Memory report pane showing memory being used by HDR Shop against available RAM.
- Expanded right-click context menu with full cascading menu access.
- Multiple image select/reorder images tool:
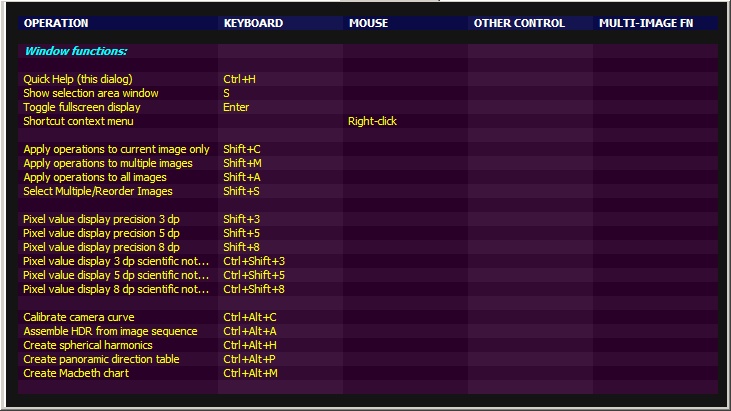
See below (4) or 15.15 for more information. - Quick help window displaying all keyboard and mouse controls in HDR Shop.
- Color-coded pixel channel display:
- Support for versions of Windows newer than Windows XP 32-bit
We have tested the latest release of HDR Shop on Windows Vista and Windows 7 without any problems. The software also runs without any problems on 64-bit versions of XP/Vista/7, although we have not as yet created a 64-bit optimized version of HDR Shop. - New built-in and external help documentation
Includes this document in PDF or HTML formats, and a new Quick Help window which lists all keyboard and mouse controls in HDR Shop. Accessed via the 'Help' menu or 'Ctrl+H' - Improved HDR assembly
HDR Shop 2.0 had two mechanisms for creating HDR images from image sequences - one for LDR images and one for Canon RAW images. These interfaces have been combined into one new interface, which now allows you to create HDR images from any LDR, HDR or RAW format using either image pixel values or EXIF file metadata to guide the assembly. Furthermore, the assembly algorithm has been improved by the addition of a new dynamic weighting scheme that takes any non-constant change in exposure within the image sequence into account. See this tutorial for more practical guidelines. - Improved support for RAW images
Support for RAW images has been improved from HDR Shop 2.0 which only supported a handful of Canon cameras in the old CRW format. The RAW importer in HDR Shop v3.0 is completely new and supports all major manufacturers RAW formats including:
- Canon (*.crw, *.cr2, *.tif)
- Nikon (*.nef)
- Kodak (*.dcr, *.kdc, *.dc2, *.k25)
- Fuji (*.raf)
- Olympus (*.orf)
- Minolta/Konica (*.mrw, *.arw, *.mdc)
- Pentax (*.pef)
- Sony (*.srf)
- Adobe Digital Negative (*.dng)
- Casio (*.qvs, *.bay)
- Panasonic/Leica/Casio (*.raw)
- Sigma (*.x3f)
- Epson (*.erf)
- Imacon/Hasselblad (*.fff)
- CREO (*.mos)
- Fotoman (*.pxn)
- Ricoh (*.rdc)
The new RAW importer:
The RAW importer uses dcraw by Dave Coffin.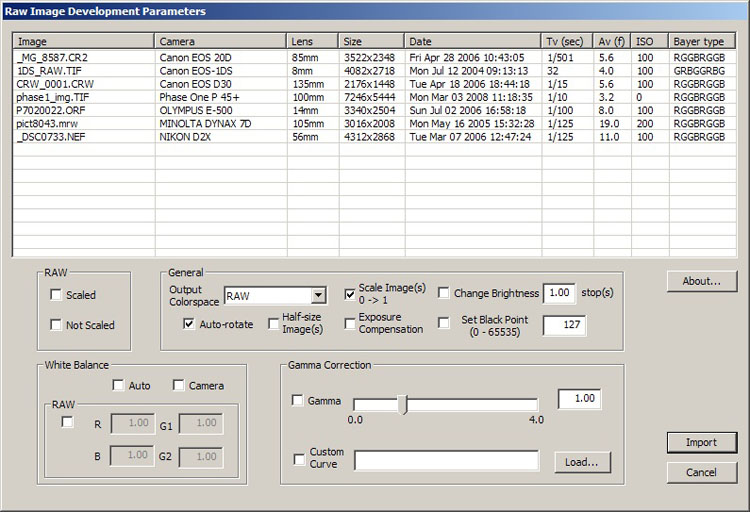
See this tutorial for information on importing RAW images. - External batch-processing of HDR, RAW, and LDR images
HDR Shop v3.0 includes a small command-line tool ('rawTool.exe') allowing offline batch processing of large numbers of images. Batch processing can be used for creating HDR images or converting images from one format to another. The command line tool performs these processes significantly faster than a Javascript script called from within HDR Shop. Also included is a small command line tool (batchGen.exe) allowing creation of simple batch files for users who have limited experience in writing scripts or more involved programming. See this tutorial for instructions on using the rawTool. - New built-in light probe sampling tool
Light probe sampling was only available in HDR Shop 2.0 as an external plugin using the 'Median Cut' method. We have written this function into HDR Shop v3.0 and have also improved on it with the addition of a new 'Variance Minimization' sampling technique. See this tutorial for instructions on using the probe sampling tool. - Modified multi-threaded queuable architecture
This feature has been retained in HDR Shop v3.0, modified to ensure that images now load in the correct order. In HDR Shop 2.0 loading several images simultaneously produces a random ordering of the images because of asynchronous multi-threading. In HDR Shop v3.0 loading of multiple images is treated as a single thread which preserves the original ordering of the images. None of the images in that particular thread can be utilized until all have been loaded. However this does not prevent the user from operating on other open images while the current images are being loaded.
A related new image reordering facility has also been added to HDR Shop v3.0 (next item). - New image management window
New popup window which tracks the state of all open images in HDR Shop enabling two distinct functions:
- The order of the images can now be changed by a simple drag and drop operation.
- Multiple images can be chosen and any multi-image enabled operation (most HDR Shop
functions) can be performed on that set of images.
- The order of the images can now be changed by a simple drag and drop operation.
- Color matrix determination, reference Macbeth charts for mapping to common color spaces
Create a reference color-checker chart or use to color balance images to common color spaces like sRGB or AdobeRGB. See 8.5 or see this tutorial for more information. - Support for more current file formats
* HDR Shop v3.0 now supports all common proprietary digital RAW formats.
* New plugins supporting reading & writing of Portable Network Graphics (PNG) and JPEG-HDR formats.
* Support of larger subset of OpenEXR file formats:- 16-bit signed float.
- 32-bit signed float.
- 32-bit unsigned integer.
- Any 1, 2 or 3 channels, or grayscale.
- Any of the lossless compression methods (None/RLE/Zip/Zip16/PIZ/PXR24)
* Support for reading/writing PPM files in any combination of rgb/grayscale, 8-bit(uchar)/16-bit(ushort).
* Support for writing JPEG/JPEG-HDR with a specified 'quality' (as a %).
* For those image parameters that can be deduced on reading the image, HDR Shop now 'remembers' them between subsequent File
Save operations, transferable across different formats (eg an image loaded from a grayscale EXR
file will default to saving as grayscale if saving as a PNG file).
- Improved camera curve calibration tool
The camera response curve calibration tool released in HDR Shop 2 was not able to produce sufficiently robust results. The tool has been re-written for the version 3 release and the results are now significantly improved. The tool now also supports drag and drop of images as input. See this tutorial for more practical guidelines. - Miscellaneous new/improved functions
- Improved half-sizing. Uses a small blur kernel for a smoother result. See
'Image
Size
Half Size (Slower/accurate)' 10.2.
- New 'Sharpen' (10.31) and 'Edge Detector' filters (10.38).
- New image tiling schemes. The stock 'Tile' Has been replaced with Tile horizontally/vertically
and a new 'Smart Tile' function. See 'Window
' (15.3, 15.4,
15.5) for more information.
- Amalgamated image information window. Press 'I' or under 'Image
Info
Average/Sum/Max/Min/RMS' this
window gives information about the Average/Sum/Max/Min/RMS Error values in the selected area.
- Display of saturated pixel values can now be controlled. See 11.26 for more information.
- Arbitrary resize of images to dimensions of less than half fixed. Performing this operation caused the output to contain just black pixels. This is now fixed. See 10.6 for more information.
- Improved Interpolation of RAW Bayer pattern images. See 10.41 for more information.
- Command line switches added to HDR Shop. These switches can be added to a link to HDR Shop.exe to control
how the program starts up.
Currently supported switches:- '-f' = start in fullscreen mode.
- '-dp 0/1/2/3/4/5/6' = control how channel values are displayed at start:
0 = 3dp, 1 = 5dp, 2 = 8dp
3 = 3dp, 4 = 5dp, 5 = 8dp [in scientific notation]
6 = 0-255 (unsigned char from display buffer)
- Improved half-sizing. Uses a small blur kernel for a smoother result. See
'Image
Getting Help.
There are 3 main ways users can find help related to HDR Shop v3.0 :
Tutorials & function reference
The function reference for HDR Shop is in Part II of this document (here: II)This document can be accessed on the Website or directly from within the Help menu in HDR Shop, and is also available for offline download in PDF or single/multiple page HTML formats at:
http://www.HDRShop.com/documentation
Tutorials are available at http://www.hdrshop.com/main-pages/tutorials.php for help with getting to know HDR Shop.
Topics covered:
- Getting started.
How to load, view, manipulate, and save an HDR image
(link).
- Camera curve calibration.
How to figure out your camera's light response curve
(link).
- Creating an HDR image from a sequence of images.
How to create a high-dynamic range image by combining differently exposed images taken with a standard camera
(link).
- Panoramic image transformations.
How to convert a high-dynamic range panorama between various layouts
(link).
- Creating a light probe image.
How to create a Light Probe image (i.e. an HDR panorama) from one or two images of a mirrored ball
(link).
- Diffuse and specular convolution.
How to convolve your HDR panorama with a diffuse or specular kernel
(link).
- HDR image editing.
How to use a traditional image editor such as Adobe Photoshop to edit HDR images through HDR Shop
(link).
- Using an HDR Shop plugin.
How to use a plugin in HDR Shop
(link).
- Writing an HDR Shop plugin.
How to write your own plugins
(link).
- Writing an HDR Shop script.
How to write your own scripts
(link).
- The Portable Floatmap image format.
Image file format documentation by Daniel Léonard
(link).
- Color Balancing an image using a Macbeth color chart.
Compute and apply the matrix which transforms images into a desired color space
(link).
- Importing RAW images.
Explanation of how to use the RAW plugin tool
(link).
- Offline batch processing of multiple images.
Explanation of how to use the 'rawTool.exe' command line tool for batch processing
(link).
- Sampling a Light Probe Image to a Light Source List.
explains how to sample a lighting environment image (eg light probe) into a chosen number of
representative light sources using an area subdivision approach.
(link).
Help with keyboard/mouse controls
Access the built-in Quick Help facility (press 'Ctrl+H' or from the
menu 'Help

Other undocumented help - forum
- via the new HDR Shop forum hosted through our main site, (http://www.hdrshop.com; click the 'forums' tab).This forum is new and replaces the old overly-spammed PHPBB forum. The new forum is administered by current and past HDR Shop developers who will endeavor to answer any questions which are not already covered in the other help materials. We encourage all users to sign up here for any issues they might encounter related to any aspect of HDR Shop.
Credits.
HDR Shop Version 3.0
Copyright � 2001-2009 University of Southern California
All rights reserved.
Developed at the Univeristy of Southern Cailfornia Institute for Creative Technologies Graphics Lab
Core Development:
- Chris Tchou (v1.0 & v2.0)
- Bruce Lamond (v3.0)
Concept:
- Paul Debevec
Design:
- Paul Debevec
- Chris Tchou
- Bruce Lamond
- Tim Hawkins
Additional Code:
- Andrew Jones
- Andreas Wenger
- Tim Hawkins
- Paul Debevec
Auxiliary Code From:
- Mozilla SpiderMonkey
- Andrei Stcherbatchenko
- Paul Selormey
- James R. Twine
- Chris Losinger
- Yury Goltsman
- Greg Ward
- Sam Leffler
- Jean-loup Gailly
- Mark Adler
- Dave Coffin
- Keith Rule
- Sébastien Andre
- Chris Maunder
Thanks to:
- Dan Maas
- Dan Lemmon
- Craig Halperin
- Brian Emerson
- Marc Brownlow
- Marcos Fajardo
- Brendan Eich
- Jonathan Cohen
- Jessi Stumpfel
- Andrew Gardner
- Andrew Jones (documentation)
- Jay Busch (website guru)
Documentation:
- Bruce Lamond
This software is based in part on the work of the Independent JPEG Group
Reference Function List (by Menu)
In this part we present an exhaustive list of the functions available in HDR Shop v3.0 grouped by
menu. We assume that the reader is familiar with basic standard Windows operations such as using GUI
menus, handling files, using keyboard shortcuts etc. Consequently, only the more specialized functions
are described in any detail. Keyboard shortcuts are given in '[]' following the function name. A
'
M' following the function name indicates that the operation can be
applied to multiple images simultaneously. See the 'View
`File' menu
New... [Ctrl+N]
Create a new image. The user specifies X and Y dimensions (pixels) in the popup dialog. Default size is 640x480 pixels.
Open... [Ctrl+O]
Open an image or script via dialog or drag'n'drop directly onto a window.
Supported image formats:
- High Dynamic Range:
- Radiance files (*.hdr, *.pic)
- TIFF files (*.tif, *.tiff)
- Portable Floatmap files (*.pfm)
- OpenEXR files (*.exr)
- JPEG-HDR files (*.jpg, *.jpeg)
- Raw Binary files (*.raw, *.float)
- Low Dynamic Range:
- JPEG files (*.jpg, *.jpeg)
- Portable Network Graphics files (*.png)
- Windows Bitmap files (*.bmp)
- TIFF files (*.tif, *.tiff)
- Portable Pixmap files (*.ppm, *.pgm, *.pnm)
- Targa files (*.tga)
- Terse Image files (*.tim)
- Proprietary RAW Digital Formats including:
- Canon (*.crw, *.cr2, *.tif)
- Nikon (*.nef)
- Kodak (*.dcr, *.kdc, *.dc2, *.k25)
- Fuji (*.raf)
- Olympus (*.orf)
- Minolta/Konica (*.mrw, *.arw, *.mdc)
- Pentax (*.pef)
- Sony (*.srf)
- Adobe Digital Negative (*.dng)
- Casio (*.qvs, *.bay)
- Panasonic/Leica/Casio (*.raw)
- Sigma (*.x3f)
- Epson (*.erf)
- Imacon/Hasselblad (*.fff)
- CREO (*.mos)
- Fotoman (*.pxn)
- Ricoh (*.rdc)
OpenEXR: HDR Shop now supports reading & writing of Industrial Light and Magic's OpenEXR file format with 1, 2 or 3 RGB channels or grayscale with any standard precision type (16-bit signed float/32-bit signed float/32-bit unsigned int) with or without any lossless compression type. See [4] or http://www.openexr.com/ for more information.
JPEG-HDR: Greg Ward/Maryann Simmons JPEG-HDR file format stores a tone-mapped LDR representation of an HDR image together with multiplier information for each channel in APP11 markers in the same JPEG file. This creates significantly smaller (though lossy) HDR files. HDR Shop seamlessly reconstructs any JPEG-HDR encoded file into an HDR image. Note that other image viewers will show only the tone-mapped LDR version of the image. HDR Shop also supports writing of JPEG-HDR images. See http://www.anyhere.com/gward/papers/cic05.pdf/ for more information on the meaning of the write parameters.
Close [Shift+X] M
Close the current (or multiple) active image or script.Close All [Ctrl+Shift+X]
Close all current active images. A safeguard dialog prompts for confirmation before the action proceeds.Save [Ctrl+S] M
Save the current image or script in it's current format.Save As... [Ctrl+Shift+S] M
Save the current (or multiple) images in another format. A dialog prompts for the new format before a 'Save As...' dialog allows renaming/relocating. Depending on the chosen format, extra save options are displayed for some of the file types. See 'What's new in HDR Shop 3.0?' (4). finally, a safeguard dialog prompts for confirmation if multiple images are currently selected before proceeding.Save All [Ctrl+Alt+S] M
Save all current images in their current format(s).Revert M
Restore the current (or multiple) images to the last saved state.Rename [F2]
Rename the current image.Import Data file...
Import raw data in one of several formats as a new image. This function allows arbitrary image data with various bit-depths to be imported into HDR Shop. First the user specifies the file to import, then the import control dialog is displayed: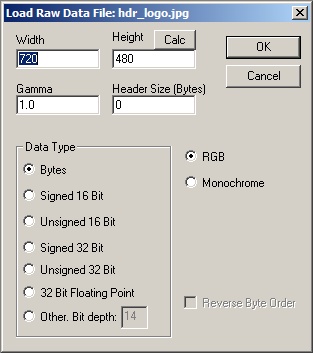
The user then hits 'OK' and the data is imported and displayed as an image.
If the user selects a bit-depth of greater than 8, they further have the choice to swap byte order if the data was written out on a machine with a different ordering regime.
Edit in Image Editor
Allows you to make changes to the current image with your default system image editor while the image is open in HDR Shop. Clicking the HDR Shop 'OK' Dialog updates the changes in the current image in HDR Shop.Open recent
Maintains a list of recently used images for easy access.Exit
Exit from HDR Shop.
`Create' menu
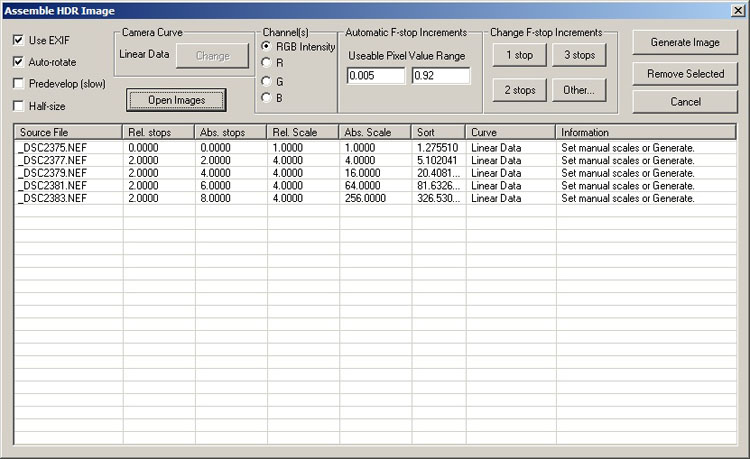
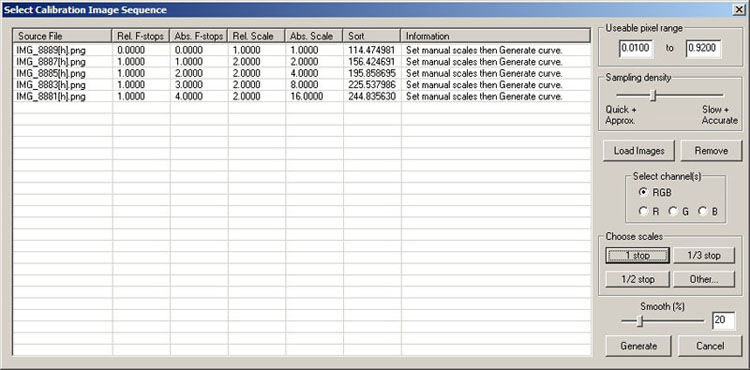
Assemble HDR From Image Sequence... [Ctrl+Alt+A]
See this
online tutorial for more detailed instructions.
HDR Shop v3.0 allows you to create HDR images from any LDR, HDR or RAW format using either image
pixel values or file metadata to guide the assembly.
Basic procedure:
Activate the tool from the menu or keyboard.
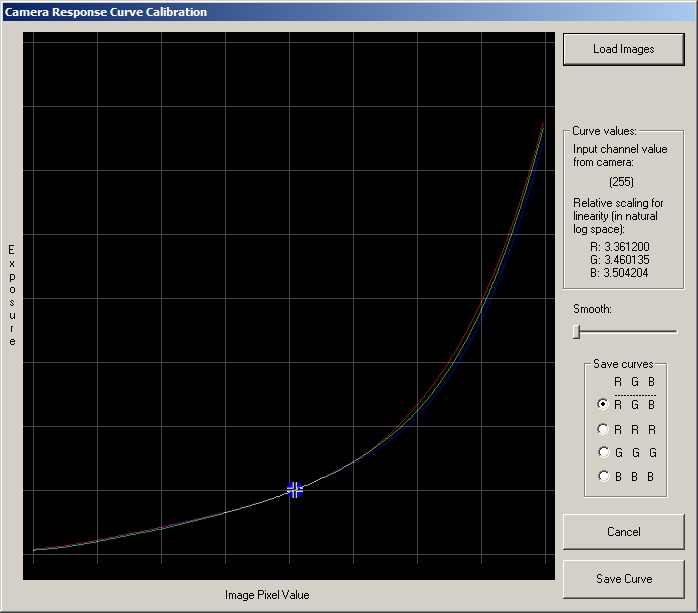
Calibrate Camera Curve... [Ctrl+Alt+C]
See this
online tutorial for more detailed instructions.
A digital camera sensor typically has a near-linear response to light within its limits, but in an effort to
make the images relate to photographic film images, the linear values are scaled in the camera according to
some non-linear mapping. When the LDR images are loaded in a typical image viewer it automatically applies
a fixed reverse response function (gamma correction) in order to make the values appear linear on whatever
display is being used. The camera curve calibration tool allows you to recover the non-linear mapping (
camera response function)
that was applied, using a sequence of images of a scene taken from a fixed viewpoint, requiring only that you
specify the relative exposure differences between the images in the sequence.
Basic procedure:
Activate the tool from the menu or keyboard.
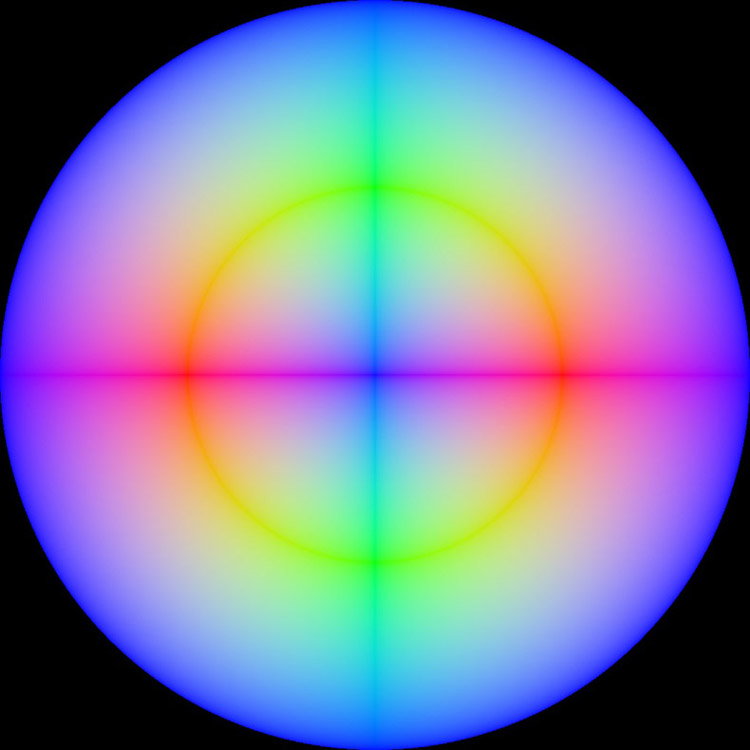
Spherical Harmonics... [Ctrl+Alt+H]
Spherical Harmonic (SH) images can be used to calculate the lighting on a 3D model from area light sources in real
time. HDR Shop allows you to quickly create any SH image mapped into various panoramic formats. The dialog is
shown below:
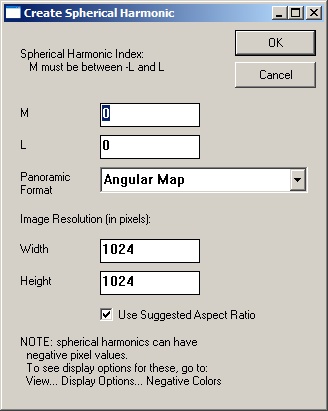
- Angular Map
- Mirrored Ball
- Mirrored Ball Closeup
- Diffuse Ball
- Latitude-Longitude
- Cubic Vertical Cross
- Cubic Horizontal Cross
Panoramic Direction Table... [Ctrl+Alt+P]
Create an image plot of unit-length 3D surface normal directions in one of various panoramic formats. A panoramic
direction table in the 'Angular Map' format is shown below:
Available panoramic formats (See this online tutorial for more information about these formats):
- Angular Map
- Mirrored Ball
- Mirrored Ball Closeup
- Diffuse Ball
- Latitude-Longitude
- Cubic Vertical Cross
- Cubic Horizontal Cross
Macbeth Chart... [Ctrl+Alt+M]
Create a small
Available reference color space charts:
- NTSC RGB
- sRGB (default)
- PAL RGB
- Colormatch RGB
- Adobe RGB
- Apple RGB
- CIE RGB
- WideGamut RGB
- SMPTE RGB
- Monitor RGB
- Best RGB
- Beta RGB
- Bruce RGB
- Don RGB
- ECI RGB
- Ekta RGB
`Edit' menu
Cut [Ctrl+X]
Applies to both images and scripts. For images, the user selects an area (see 13) and the selected area is cut out and held in a buffer. With scripts, 'Cut' works as with any standard text editor.Copy [Ctrl+C]
Applies to both images and scripts. For images, the user selects an area (see 13) and the selected area is copied and held in a buffer. With scripts, 'Copy' works as with any standard text editor.Copy as Text [Ctrl+T]
copy image or selected area to text buffer as Ascii RGB values.Paste [Ctrl+V]
Applies to both images and scripts. For images, the area held in the copy buffer is copied into the current image. Note that if an area is selected in the pasting target image, the buffer will be copied in to the selected area starting at the top left corner regardless of whether the selected area is large enough to contain the buffer or not. Use the 'Show Selection Area Window' (13.3) facility to control the exact size of selected area. If no area is selected, the buffer overwrites the current image completely - ie the current image will be replaced by the buffer. With scripts, 'Paste' works as with any standard text editor.
`Image' menu
Size
Half Size (Quick/simple)
M
Half-size an image by dividing the image into a square grid with each square containing 4
pixels. Simply take the average value of the 4 pixels and write out as one pixel. This method
produces aliasing at boundaries of contrast in the image (cf. 10.2).
Size
Half Size (Slower/accurate)
M
Half-size the image using a simple small blur kernel of size 1-2-1. This helps reduce aliasing
which may be present if the Quick/Simple method is used(10.1). The image
is blurred slightly in the horizontal direction for each consecutive 3 pixels with a 1-2-1
weighting function. This is repeated for the vertical direction, then a 'Half Size (Quick/simple)
is done on the blurred image. The resulting image is thus slightly blurred such that simple
half-size aliasing is diminished giving a less jagged result. The process is slightly
slower due to the double blur operation.
Size
Double Size
M
Double the width & height of the image. Uses bilinear interpolation of the existing values to
infer the extra pixel values.
Size
Half Size X
M
Reduce the width of the image by half from the average of consecutive pairs of pixels in each
horizontal line in the image.
Size
Half Size Y
M
Reduce the height of the image by half from the average of consecutive pairs of pixels in each
vertical line in the image.
Size
Arbitrary Resize...
M
Change the image dimensions to any values. Choosing this item prompts the user with a dialog allowing
the dimensions to be specified along with choice of resizing method:
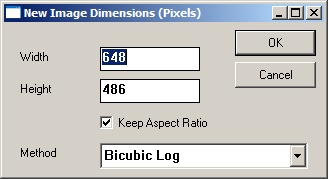
One of the following resizing methods is chosen (in order of increasing quality/decreasing speed):
- Nearest neighbor interpolation:
Pixel values from the old image are copied in to the nearest corresponding location in the new image regardless of the surrounding pixel values. - Bilinear interpolation:
Uses the 4 surrounding pixels (horizontally and vertically) to interpolate values. - Bicubic interpolation:
Uses the a weighted average square of neighboring pixels from the original image
to drive the interpolation. Weights are derived in terms of a cubic function.
square of neighboring pixels from the original image
to drive the interpolation. Weights are derived in terms of a cubic function.
- BSpline interpolation:
Uses the a weighted average
square of neighboring pixels from the original image
to drive the interpolation. Weights are derived in terms of a BSpline function.
- Bilinear Log interpolation:
Uses the 4 surrounding pixels (horizontally and vertically) to interpolate values in Log space. - Bicubic Log interpolation [default]:
Uses the a weighted average
square of neighboring pixels from the original image
to drive the interpolation. Weights are derived in terms of a cubic function and in Log space.
Planar Transformations
Rotate
[R]
M
Rotate the image by
Planar Transformations
Rotate
M
Rotate the image by
Planar Transformations
Rotate
[Shift+R]
M
Rotate the image by
Planar Transformations
Rotate Arbitrary...
M
Rotate the image by an arbitrary amount. The user specifies the amount of clockwise rotation
in degrees. Note: the resulting image will be larger, reflecting the rectangular bounding rectangle
that touches the rotated image corners. New pixels are set to black.
Planar Transformations
Flip Horizontal [H]
M
Flip the image across the right vertical edge
Planar Transformations
Flip Vertical [V]
M
Flip the image across the bottom horizontal edge
Planar Transformations
Shift with Wrap...
M
Shift the image up or down and left or right. Pixels that are shifted off one edge
are tacked on to the opposite edge ('wrapped').
Planar Transformations
Shear...
M
Shear the image so that the bottom edge moves relative to the top. The amount of shear is selected
as:
(bottom edge horizontal shift)
The resulting image will be larger than the original to accomodate the bounding rectangle which touches the sheared image corners.
Planar Transformations
Rectify...
M
Resample a quadrilateral area within the image to a rectangular image with the same or different
dimensions. In order to rectify a quadrilateral area, first the area must be demarcated with 4 points
(Shift+left-click) using the 'Point Editor' window (15.12). The 4 points must be
arranged so that they form the quadrilateral when taken in anti-clockwise order beginning from the
top-leftmost location. Select 'Image
Spherical Transformations
Panoramic Transformations...
Transform a panoramic source image into any of several useful other panoramic image spaces.
See the online tutorials here
for more information on these formats and an example of how to create a panormaic transformation.
The source/destination panoramic spaces can be any of:
- Light Probe (Angular Map)
- Mirrored Ball
- Mirrored Ball Closeup
- Diffuse Ball
- Latitude/Longitude
- Cubic environment (Vertical Cross)
- Cubic environment (Horizontal Cross)
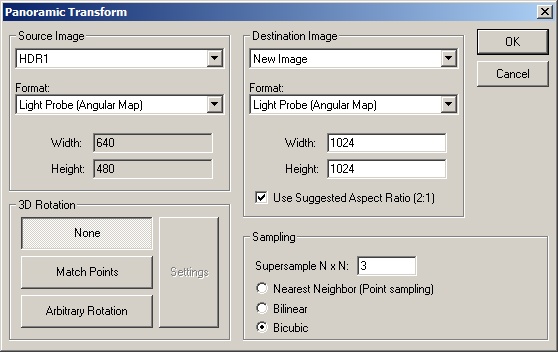
Choose the source image from the list of open images. Describe the panoramic format of the source image from the drop-down box as described above. Choose the target image or use the default behavior which is to create a new image. Choose the panoramic transformation format for the output image. Specify the output image dimensions, note the aspect ratio check box, and (optionally) specify a 3D rotation.
Spherical Transformations
Diffuse/Specular Convolution...
M
HDR Shop can perform a diffuse or specular convolution on a high-dynamic range
Spherical Transformations
Ward Specular Convolution...
M
Simulates a rough specular sphere lit by a light probe. The input and output images should be
in lat-long format (see 10.16). Furthermore the input image must have width = 2
Spherical Transformations
Fast Diffuse Convolution (Lat-Long)
M
Simulates a diffuse sphere lit by a light probe. The input and output images should be
in lat-long format (see 10.16).
The output image will be a diffuse convolution of the input image or light probe using the Lambertian BRDF model.
This is useful if you need to pre-compute a diffuse texture map; for example, to light an
object using a light probe in real time applications. Lighting a diffuse surface with a preconvolved
environment map produces a similar effect to lighting an actual diffuse surface with the original light probe.
An example HDRShop script which performs the function can also be found
here
Spherical Transformations
Spherical Harmonic Reconstruct Lat-Long...
M
Approximates the input image/light probe as a sum of spherical harmonics up to the desired order. See this
here
for more information.
Spherical Transformations
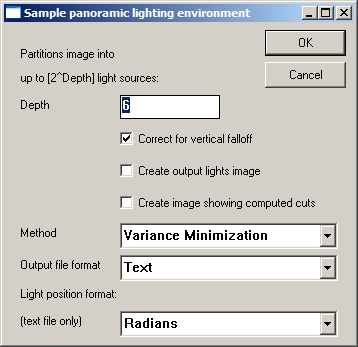
Sample Light Probe Image to Light Source List...
M
Samples a spherical lighting environment image into a number of areas where each area contains a single light source.
Choice of areas and light source positions and intensities are computed based on the distribution of energy in parts
of the image. In this way, the light source position and intensity most representative of each particular area is
obtained. This is useful in rendering lighting environments where efficiency is paramount and a good approximation
to the full resolution environment will suffice. The output is a text window listing the sampled positions and
intensities in one of: plain text (spherical positions in radians or degrees, or as unit vectors on the sphere), Maya MEL
script, or PBRT format, and also optionally either or both of: an image showing sampled pixel lighting
locations and intensities; an image showing the subdivision areas of the image as a graph.
The 'Sample Panoramic Lighting Environment...' dialog:
Filter
Neighbor Average Blur
M
Each pixel is set to a weighted distance average of its immediate 8 neighbors.
Performs very simple, very fast blur of fixed size.
Filter
Gaussian Blur...
M
Apply a 2D Gaussian blur with specified kernel width in pixels
Filter
Bilateral Filter...
M
Edge-preserving blurring filter. The filter weights the convolution in 2 domains so that
the pixel is replaced with the weighted average of its neighbors in both space and intensity.
Filter
Motion Blur...
M
Produces a linear blur with a selected width and at a selected angle chosen from a dialog box.
Pixels are given the average value of all pixels (including subpixels) within the angled window with the given width.
Filter
Horizontal Motion Blur...
M
Approximates horizontal motion blur by setting each pixel to be the average of pixels in a window with width
specified in the dialog box. Optimized to be faster than motion blur with arbitrary direction.
Filter
Circle Blur...
M
A simple blur filter which creates a circular kernel with the radius given in the dialog box. The
values within the kernel sum to 1. The image is then convolved with this kernel. The kernel format
is such that inside the circle, the values are the same everywhere and the edge pixels fall off
smoothly from this value (akin to a Gaussian blur with minimal spread).
Filter
Small Circle Blur...
M
A simple blur filter which creates the following ![$ \left[ \begin{array}{ccccc}
0.000000 & 0.015873 & 0.039683 & 0.015873 & 0.0000...
...73 \\
0.000000 & 0.015873 & 0.039683 & 0.015873 & 0.000000 \end{array} \right]$](img14.gif)
to produce a weighted circular distance average value for each pixel.
Filter
Star Filter
M
Generates s vertical and horizontal star-shaped blur approximating simple image glare.
Filter
Deinterlace
M
Removes common 'tearing' artifacts in deinterlaced images by doing a simple 1-2-1 weighted vertical blur on the
consecutive interlaced fields.
Filter
Incremental Adaptive Unsharp Sharpen [^]
M
Do a small incremental sharpen on the image using the 'adaptive unsharp sharpen' method:
New image = Original image + Convolve(original image, kernel) where kernel =
![$ \frac{1}{16}\times\left[ \begin{array}{ccc}
-1 & -2 & -1 \\
-2 & 12 & -2 \\
-1 & -2 & -1 \end{array} \right]$](img15.gif)
Filter
Sharpen By... [Ctrl+6]
M
Sharpen an image by a specified amount using one of 5 convolution kernels.
Filter
Laplacian of Gaussian...
M
Alternative sharpening filter. The Gaussian operation smoothes noise. The Laplacian part enhances
edges by both down-weighting and up-weighting the opposing values across an edge. The image is
filtered by a LoG filter and the result is added to the original image to produce the sharpening.
Filter
X Derivative
M
Computes the local gradient in the X direction based on the x-1,x+1 values.
Filter
Y Derivative
M
Computes the local gradient in the Y direction based on the y-1,y+1 values.
Filter
Gradient
M
Filter the image according to
Filter
Corner Detect
M
A simple corner detection filter which convolves the image with the ![$ \left[ \begin{array}{ccccc}
-1 & -1 & 0 & 1 & 1 \\
-1 & -1 & 0 & 1 & 1 \\
0 ...
...& 0 & 0 & 0 \\
1 & 1 & 0 & -1 & -1 \\
1 & 1 & 0 & -1 & -1 \end{array} \right]$](img17.gif)
Filter
Edge Detectors
Gradient Based...
M
A simple edge detector which produces a binary image depicting edges according to the
chosen threshold value. The filter simply does a 'Gradient' filter (10.36)
operation and then sets pixels above the threshold value to white, otherwise to black.
Filter
Edge Detectors
Laplacian of Gaussian Based...
M
Alternative edge detector based on 'Laplacian of Gaussian' filter (10.33). The
LoG filter produces an image where values across an edge are positive on one side and
negative on the other. The filter then simply computes the zero-crossing points and sets those
with sufficiently high gradient to white, otherwise to black.
Filter
Calculate Normals
M
Computes a field of surface normals from the input image assuming that the input image represents a point cloud
of values in x,y,z so that x = r, y = g, z = b. The normals are then computed based on the neighboring 'x,y,z'
values.
Filter
Interpolate Bayer Pattern...
M
Interpolate RAW digital camera single channel image into 3 channel image.
Most common high-end digital camera sensors record an image under a color filter array of red, green and blue filters in one of 4 possible arrangements called a Bayer pattern. The filter pattern is a mosaic of 50% green, 25% blue and 25% red. Uninterpolated RAW images are thus single channel, but can be interpolated to 3 channels using the known Bayer pattern.
Possible Bayer patterns:
- RGGB
- BGGR
- GRBG
- GBRG
- Adaptive Homogeneity Directed (AHD):
A relatively new technique which constructs a homogeneity map of the image and uses that map to choose which direction to interpolate in. This significantly reduces color artifacts compared to other techniques. - Second-Order Gradient:
Evaluates gradients around the pixel of interest and makes a smoothness estimate based on the lower of these gradients. Suffers from color artifacts. Recommended to use AHD above
Filter
DCT (Discrete Cosine Transform)
M
Convert an image from the spatial domain into the frequency domain
Filter
IDCT (Inverse Discrete Cosine Transform)
M
Convert an image from the frequency domain into the spatial domain
Warp
Correct Lens Distortion
M
'Undistort' the image using the given optical calibration parameters.
Correct Lens Distortion dialog:
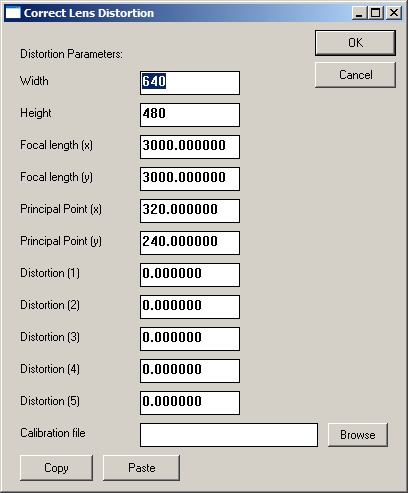
Description of distortion parameters:
- Width: input image width
- Height: input image height
- Focal length (x): focal length of the lens in pixels
- Focal length (y): focal length of the lens in pixels
- Principal Point (x): point through which the Center of Projection passes (usually the center of the image)
- Principal Point (y): point through which the Center of Projection passes (usually the center of the image)
- Distortion (1): Radial distortion
- Distortion (2): Radial distortion
- Distortion (3): Radial distortion
- Distortion (4): Tangential distortion
- Distortion (5): Tangential distortion
kc = [
fc = [
cc = [
nx =
ny =
Where:
 = radial distortion parameters
 = tangential distortion parameters
 = focal length x/y
 = principal point x/y
Effects
Vignette...
M
Darkens image close to the edges based on the radius value entered in the dialog box.
Used for generating an 'old-fashioned movie camera' appearance.
Effects
Randomize
M
Set the image pixel channels to have random values between 0 and 1.
Effects
Sepia tone...
M
Apply a color tone to a black-and-white version of the image. A color-picker dialog is displayed and
the user chooses the tone. The single channel intensity 10.62 version of the image is then computed
and the pixels values are multiplied by the chosen tone.
Effects
Quantize
M
Rescale the image into the specified number of discrete values.
Effects
Signed Quantize
M
Rescale the image into the specified number of discrete values allowing for negative values.
Effects
Vertical Cosine Falloff
M
Applies a cosine scale to each pixel based on the pixel's vertical location. This is used
to scale an image into an equal-area weighted representation. eg lat-long images generated in HDRShop
like some World Map projections, are stretched at the poles (top & bottom) so that those pixels
are over-represented relative to those at the equator (mid-horizontal line of pixels).
Pixel
Set/Clear...
M
Set the pixel channel values within the selected region to the values specified in the dialog.
Pixel
Offset...
M
Increment/decrement the pixel channel values within the selected region by the values specified in the dialog.
Pixel
Scale...
M
Multiply the pixel channel values within the selected region by the values specified in the dialog.
Pixel
Divide...
M
Divide the pixel channel values within the selected region by the values specified in the dialog.
Pixel
Power...
M
Raise to a power the pixel channel values within the selected region by the values specified in the dialog.
Pixel
Exponentiate...
M
Raise the values specified in the dialog to the power of the pixel channel values within the selected region.
Pixel
Log...
M
Take the Logarithm of the pixel channel values within the selected region in the base of the values specified in the dialog.
Pixel
Replace Infinite/NAN...
M
Replace any non-real values with a real value within the selected region.
Pixel
Round
M
Replace values greater than or equal to 0.5 with 1, and values less than 0.5 with 0 within the selected region.
Pixel
Floor
M
Round the channel values down to the next lower integer value within the selected region. eg
Pixel
Ceiling
M
Round the channel values up to the next higher integer value within the selected region. eg
Pixel
Desaturate
M
Desaturate the selected pixel values according to the weighting scheme in
http://www.sgi.com/misc/grafica/matrix/.
The weights used are:
D = 0.3086  red + 0.6094
green + 0.0820
blue
red + 0.6094
green + 0.0820
blue
Note that these values are distinct from computing 'Intensity' used elsewhere in the software, which we take as being:
I = 0.299
red + 0.587
green + 0.114
blue
Pixel
Scale to Current Exposure [Ctrl+0]
M
Set the channel values to the exposure in the current display within the selected region. Every +1 stop will
double the channel value.
Pixel
Clamp at Current Exposure
M
Set the channel values to the exposure in the current display within the selected region. Every +1 stop will
double the channel value. Set new channel values of greater than 1 to 1 and divide all channel values by
Used to show the effect of losing some of the dynamic range in an HDRShop image.
Pixel
Normalize
M
Normalize per pixel channels. eg
red channel =
Pixel
Lower Threshold...
M
Set pixel values of less than the chosen thresholds (per channel) to the threshold values within the selected region.
Pixel
Upper Threshold...
M
Set pixel values of greater than the chosen thresholds (per channel) to the threshold values within the selected region.
Pixel
Swap Byte Order [B]
M
Swap the byte order in the case that the current image was created on a system with a different byte order regime.
Pixel
White-Balance Selection
M
Leverage an area known to be white or gray in the image to color balance the rest of the image. This is useful
where one or more of the channels in the image are overly high.
Procedure: Select an area known or assumed to be any shade of gray up to white and select this menu item. HDR Shop computes the mean channel values within the selected region, takes the intensity (10.62) of the mean values and divides the intensity by the mean channel value, then multiplies each channel in the whole image by the result of that division for that channel. When this is applied, the average channel values in the selected region will now be almost identical (ie gray-white) and this correctional scaling will have been propagated to the rest of the image.
Pixel
Scale Selection to White
M
Leverage an area known to be white in the image to color balance the rest of the image. This is useful
where one or more of the channels in the image are overly high.
Procedure: Select an area known or assumed to be white and select this menu item. HDR Shop computes the mean channel values within the selected region then each channel in the whole image is scaled by the reciprocal corresponding mean channel value. When this is applied, the average channel values in the selected region will be almost exactly 1 and this correctional scaling will have been propagated to the rest of the image.
Pixel
Compute Color Matrix...
Compute the
Procedure:
Requires 2 images of the same size to operate on. Select the source and target images from the dialog and click OK. HDR Shop solves by creating a system of linear equations from each pixel channel. This system is then solved by finding the pseudo-inverse using SVD. the resulting
See this tutorial for more information.
Pixel
Apply Color Matrix...
M
Change the pixel values in the image via a
See this tutorial for more information.
Pixel
Rasterize Triangle
M
the user specifies a triangle in three points using the point editor (15.12).
Triangle is textured using barycentric coordinates with R, G, B at vertices.
Pixel
Index Map
M
Stores the image pixel coordinates in the red and green channels.
Info
Max/Min/Average [I]
Show Maximum/Minimum/Average/Sum/RMS error information about the selected area. Note: if no area is selected,
information for the whole image is shown. Average channel values are the mean. Pixel channel values can be
copied to the text buffer. Pixel locations for maximum and minimum channels are shown beneath the values.
Info
Copy Average [C]
Copy the mean channel values within the selected region to the text buffer.
Info
Sample Grid...
This function is used to create a grid sampling of colors which represent the mean values within the image
or selected area. Typically this is used to color balance an image against a reference set of known colors
such as a Gretag-Macbeth color chart.
Procedure:
There are 2 available methods for obtaining the sample area:
Pre-rectify method:
If the image of the color chart was not orthogonal to the camera you can rectify the chart as a rectangle by first selecting the 4 grid corner points. Mark the 4 corners (Shift+left-click) in a counter-clockwise pattern starting with the top-left corner.
Drag-select method:
Select the area of the image to be sampled or just leave blank if using the whole image.
Select the Image![]() Info
Info![]() Sample Grid... dialog. Enter the grid dimensions and the
number of samples (horizontally & vertically) to be taken from the center of each grid square. 10 samples
in width and height will cause the
Sample Grid... dialog. Enter the grid dimensions and the
number of samples (horizontally & vertically) to be taken from the center of each grid square. 10 samples
in width and height will cause the
![]() square in the grid square center to be used as the samples.
If you are rectifying the image first, a 'Use points to rectify rectangle first' checkbox will be shown
and checked automatically. On clicking 'OK', an intermediate rectangular image is computed from the
homography between the corresponding sets of corners and this image is then used as the input to the
sampling algorithm.
The mean value for each set of grid square samples is computed and output as an image with one pixel for
each grid square with the value of the mean of the samples within the input grid.
square in the grid square center to be used as the samples.
If you are rectifying the image first, a 'Use points to rectify rectangle first' checkbox will be shown
and checked automatically. On clicking 'OK', an intermediate rectangular image is computed from the
homography between the corresponding sets of corners and this image is then used as the input to the
sampling algorithm.
The mean value for each set of grid square samples is computed and output as an image with one pixel for
each grid square with the value of the mean of the samples within the input grid.
See
this
tutorial for more information.
Crop M
Crop the image to the selected area. Either select an area with a 'left-click and drag' operation or with the 'SelectCalculate
Perform various math operations on between one & four of the currently open images.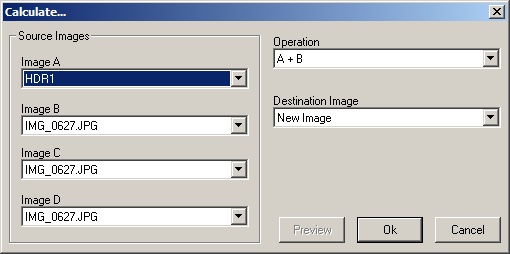
- Addition (A,B) Add A and B
- Subtraction (A,B) Subtract B from A
- Multiplication (A,B) Multiply A and B
- Division (A,B) Divide B by A
- Absolute Magnitude (A) Absolute pixel values in A
-
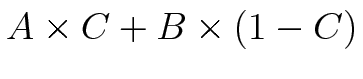 (A,B,C)
Blend A and B weighted by C (alpha blend of B & A with C as the mask)
(A,B,C)
Blend A and B weighted by C (alpha blend of B & A with C as the mask)
- Addition (A,B,C,D) Add A, B, C and D
- Panorama Blend (A,B,C,D) Compute the mean pixel value across all 4 images.
- Maximum (A,B,C,D) Find the maximum values at each pixel in all four images
- Minimum (A,B,C,D) Find the minimum values at each pixel in all four images
- 1 minus image (A) Compute (1 - A)
Duplicate [D]
See 'Window
`View' menu
Zoom In [Ctrl+
plus
]
M
Alternative control: 'Ctrl+mouse-wheel-up' or 'mouse-middle+mouse-left'.
Zoom in to double magnification. With the mouse controls, the zoom will be centered at the cursor. The keyboard control zooms in around the top-left point of the image.
Zoom Out [Ctrl+
minus
]
M
Alternative control: 'Ctrl+mouse-wheel-down' or 'mouse-middle+mouse-right'.
Zoom out to half magnification. With the mouse controls, the zoom will be centered at the cursor. The keyboard control zooms out around the top-left point of the image.
Center [(Numpad) 5] M
Alternative control: 'Ctrl+left-click'.Center the image within the current image frame.
Fit Window [Ctrl+(Numpad) 5] M
Alternative control: 'Ctrl+right-click'.Expand or shrink the image frame to fit the current image.
Align All [A]
Change zoom and relative image to frame position on all other images to match current image.
Apply to Current Image [Shift+C]
Alternative control: left-click on status-bar pane marked with 'Current/Multiple/All'.
Default behavior of HDR Shop - perform all operations on current image only. See 'Window
Apply to Multiple Images [Shift+M]
Alternative control: left-click on status-bar pane marked with 'Current/Multiple/All'.Perform multi-image enabled operations on selected images. See 'Window
Apply to All Images [Shift+A]
Alternative control: left-click on status-bar pane marked with 'Current/Multiple/All'.Perform multi-image enabled operations on all images. See 'Window
Exposure
Stop Up [
plus
]
M
Alternative control: 'mouse-wheel-up'.
Increase the exposure by 1 stop (pixel values
Note: changing exposure only affects the displayed values, not the underlying pixel values (unless subsequently done with 'Scale to current exposure': 10.63).
Exposure
1/10 Stop Up [Shift+
plus
]
M
Alternative control: 'Shift+mouse-wheel-up'.
Increase the exposure by
Note: changing exposure only affects the displayed values, not the underlying pixel values (unless subsequently done with 'Scale to current exposure': 10.63).
Exposure
1/10 Stop Down [Shift+
minus
]
M
Alternative control: 'Shift+mouse-wheel-down'.
Decrease the exposure by
Note: changing exposure only affects the displayed values, not the underlying pixel values (unless subsequently done with 'Scale to current exposure': 10.63).
Exposure
Stop Down [
minus
]
M
Alternative control: 'mouse-wheel-down'.
Decrease the exposure by 1 stop (pixel values
Note: changing exposure only affects the displayed values, not the underlying pixel values (unless subsequently done with 'Scale to current exposure': 10.63).
Exposure
Stop All to Current [Q]
Set display exposure on all other images to that of the current image.
Exposure
Reset to Zero [0]
M
Reset display exposure to zero stops.
Exposure
Custom...
M
Set display exposure of current image to a custom value.
Display Curve
Gamma 2.2
Set display exposure of current image to gamma 2.2.
Note: changing exposure only affects the displayed values, not the underlying pixel values.
Display Curve
Gamma 1.75
Set display exposure of current image to gamma 1.75.
Note: changing exposure only affects the displayed values, not the underlying pixel values.
Display Curve
Gamma 1.0
Set display exposure of current image to gamma 1.0.
Note: changing exposure only affects the displayed values, not the underlying pixel values.
Display Curve
Custom...
Set display exposure of current image to a custom gamma value.
Note: changing exposure only affects the displayed values, not the underlying pixel values. The custom gamma dialog has been improved to allow the user to calibrate their particular system to the 'best' gamma for displaying images in HDR Shop:
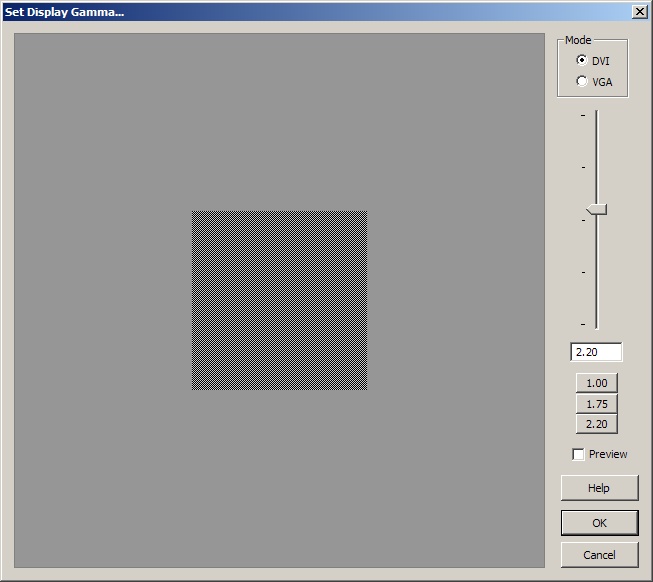
Select DVI or VGA depending on your monitor connection.
For DVI: the inner square is a dithered black and gamma-corrected grey checkerboard pattern.
For VGA: the inner square is an alternating black and gamma-corrected grey scanline pattern.
The outer square grey linear intensity is the average linear intensity of the dithered pattern.
When the optimum display gamma for the current monitor is selected the inner square should be as close to invisible against the outer square...
Fine tune with the Mouse wheel, Arrow or Page Up/Down keys...
Also note that the value chosen for the best gamma value is written to the registry entry for HDR Shop and automatically applied to all LDR images subsequently saved or loaded with HDR Shop.
Display Options
Negative Colors
Absolute Value
M
Control how negative values are displayed inside HDR Shop.
Negative pixel values are valid inside HDR Shop and some associated HDR file formats (pfm, tif, fim).
Set to 'Absolute Value' (default behavior) displays negative values as positive (no change to actual pixel values).
Display Options
Negative Colors
Black
M
Control how negative values are displayed inside HDR Shop.
Negative pixel values are valid inside HDR Shop and some associated HDR file formats (pfm, tif, fim).
Set to 'Black' displays negative values as black (no change to actual pixel values).
Display Options
Negative Colors
Color...
M
Control how negative values are displayed inside HDR Shop.
Negative pixel values are valid inside HDR Shop and some associated HDR file formats (pfm, tif, fim).
Set to 'Color' displays negative values with the chosen color (no change to actual pixel values).
Display Options
Negative Colors
Offset Gray
M
Control how negative values are displayed inside HDR Shop.
Negative pixel values are valid inside HDR Shop and some associated HDR file formats (pfm, tif, fim).
Set to 'Offset Gray' maps [-1
Display Options
Negative Colors
Negative
M
Control how negative values are displayed inside HDR Shop.
Negative pixel values are valid inside HDR Shop and some associated HDR file formats (pfm, tif, fim).
Set to 'Negative' displays negative values and positive values with the same absolute value to different colors. This is useful for viewing eg Spherical Harmonics which can have the same absolute value across alternate lobes, but opposite sign.
Display Options
Saturated Colors
Normal
M
Control how saturated values (pixel values greater than 1 at 0 stops) are displayed inside HDR Shop.
Set to 'Normal' displays saturated values as for channel values = 1 (no change to actual pixel values).
Display Options
Saturated Colors
Color...
M
Control how saturated values (pixel values greater than 1 at 0 stops) are displayed inside HDR Shop.
Set to 'Color' displays pixels with any saturated channel in the chosen color (no change to actual pixel values).
Display Options
Channel Mask
Mask/Only Display Red [1/Ctrl+1]
M
Display the image with the red channel set to zero or with only the red channel present.
Display Options
Channel Mask
Mask/Only Display Green [2/Ctrl+2]
M
Display the image with the green channel set to zero or with only the green channel present.
Display Options
Channel Mask
Mask/Only Display Blue [3/Ctrl+3]
M
Display the image with the blue channel set to zero or with only the blue channel present.
Display Options
Channel Mask
Show All [Ctrl+
]
M
Display the image with all channels set to zero or with all channels present.
Display Options
Precision (Decimal Places)
3 [Shift+3]
Alternative control: left-click on status-bar panes displaying pixel values.
Show displayed pixel values to 3 decimal places precision.
Display Options
Precision (Decimal Places)
5 [Shift+5]
Alternative control: left-click on status-bar panes displaying pixel values.
Show displayed pixel values to 5 decimal places precision.
Display Options
Precision (Decimal Places)
8 [Shift+8]
Alternative control: left-click on status-bar panes displaying pixel values.
Show displayed pixel values to 8 decimal places precision.
Display Options
Precision (Decimal Places)
3 (Scientific Not.) [Ctrl+Shift+3]
Alternative control: left-click on status-bar panes displaying pixel values.
Show displayed pixel values to 3 decimal places precision in Scientific Notation.
Display Options
Precision (Decimal Places)
5 (Scientific Not.) [Ctrl+Shift+5]
Alternative control: left-click on status-bar panes displaying pixel values.
Show displayed pixel values to 3 decimal places precision in Scientific Notation.
Display Options
Precision (Decimal Places)
8 (Scientific Not.) [Ctrl+Shift+8]
Alternative control: left-click on status-bar panes displaying pixel values.
Show displayed pixel values to 3 decimal places precision in Scientific Notation.
Display Options
Precision (Decimal Places)
uchar gamma corrected [Shift+U]
Alternative control: left-click on status-bar panes displaying pixel values.
Show displayed pixel values to 0-255 gamma-corrected unsigned char value (values obtained from the gamma-corrected display buffer).
`Plugins' menu
Rescan Directory
Rescan the 'plugins' directory for any newly added plugins. See the online tutorials on using and writing plugins.
`Select' menu
All [Ctrl+A]
Select the whole image (or all text in a script).Deselect [Ctrl+D]
Deselect the current selection.
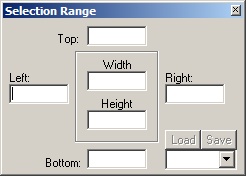
Show Selection Area Window [S]
Select an area based on exact numerical values.
Select Multiple or Reorder Images [Shift+S]
See 'Window
Draw Options
Dotted Line
Show selected region rectangle as a dotted line. Can be toggled on/off.
Draw Options
Circle
Show selected region as an ellipse. Can be toggled on/off.
Draw Options
Crop Region
None
Control display of region surrounding selection. 'None' displays the surround as normal.
Draw Options
Crop Region
Invert
Control display of region surrounding selection. 'Invert' displays the surround values as
Draw Options
Crop Region
Black
Control display of region surrounding selection. 'Black' displays the surround values as black.
Select options
Restrict Selection to Image Boundaries
Toggle on/off whether selection region can extend beyond current image boundaries.
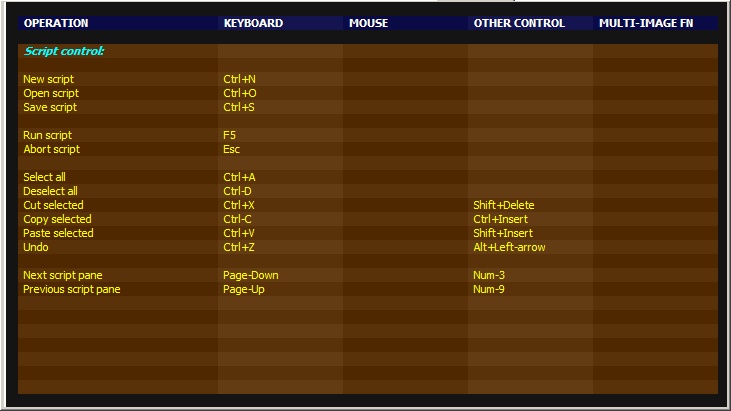
`Script' menu
See this online tutorial for information on writing and using scripts.New
Create a new script file.Open
Open an existing script file. Alternatively, use the 'Script Window' (15.13) to open a pre-existing script file.Run [F5]
Run the current script.Abort [Esc]
Abort the currently running script.
`Window' menu
Duplicate [D]
Create a duplicate image of the current image. The image name is altered to include the word 'duplicate'
for convenience.
Cascade
Tile the open images in a cascade arrangement.
Tile Horizontally
Tile the open images in a horizontal arrangement.
Tile Vertically
Tile the open images in a vertical arrangement.
Smart Tile [T]
Tile the open images such that they all fit in HDR Shop's main window real-estate. Computes which level of
'zoom-in' is required to fit all images to the screen, then finds a manner in which to fit them to that space.
Arrange Icons
Arrange minimized windows.Next Window [Page Up/Num9]
Show the next window in the window listPrior Window [Page Down/Num3]
Show the prior window in the window listToolbar
Toggle show/hide toolbar.Title Bar
Toggle show/hide title bar.Status Bar
Toggle show/hide status bar.
Point Editor
The point editor window allows sets of 2D points to be added to an image. The points can then be stored
or used as input to other HDR Shop functions (eg 'Rectification' 10.15 or
'Rasterize Triangle' 10.73). The editor dialog also includes some simple
functions to allow you to extract calibration points from an image of a camera calibration
checkerboard (see the 'Calc' menu below).
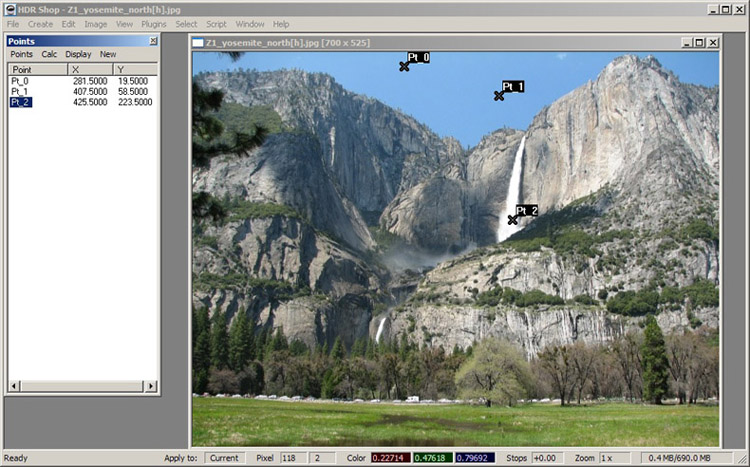
Add points directly in an image by 'Shift+left-click'. Points can be relocated by simply dragging the displayed cross associated with the cross using the left mouse button. Delete points by highlighting in the Point Editor window and pressing 'Delete'.
Import/export points:
Overwrite points in the current session with points saved to a file with 'Points
Add to points in the current session with points saved to a file with 'Points
Points should be in 'Matlab'-style format. eg here is a saved points file:
File_Names = {
'IMG_0627.JPG'
};

Point_Names = {
'Pt_0'
'Pt_1'
'Pt_2'
'Pt_3'
'Pt_4'
};

Points(:,:,1) = [
233.500000 62.500000
356.500000 106.500000
318.500000 211.500000
173.500000 163.500000
278.500000 105.500000
];
Export the current points in the session with 'Points
'Calc' menu functions:
Various calculations can be performed on the basis of the points in the current session.
The first 3 functions are primarily used for camera calibration by computing the subpixel locations of grid points in an image of a camera calibration checkerboard. The remaining 3 functions are more general.
Here is a brief tutorial on how to extract calibration points from an image of a checkerboard:
First load in an image of a checkerboard into HDRShop. Make sure the point editor is open. Select 4 points around a single grid square (with 'Shift+left-click'). The points must be chosen either clockwise or anticlockwise. Then select the 4 points in the Point list editor and choose 'Snap to Local Grid' from the 'Calc' menu. This aligns the points with subpixel accuracy to the nearest grid corners. Next choose 'Find Global Grid' from the 'Calc' menu. This finds as many of the other grid points in the image. An image representing corner location precision at each point is also created here (tight white circles sho a good fit). Poorly extracted points and those incorrectly chosen (outside the checkerboard) should be deleted. At this stage, the grid corners can be saved out or ca nbe processed further into recovery of the grid centers via 'Find Grid Centers' from the 'Calc' menu.
- Snap to Local Grid:
Takes the selected points and aligns them to the nearest checkerboard corners in the image with subpixel accuracy. - Find Global Grid:
Takes 4 selected points, and grows out adjacent squares on checkerboard based on a non-axis-aligned corner filter. This is more robust to extreme checkerboard angles. - Find Grid Centers:
Replaces the point list with centers of checkerboard squares (average of neighboring points). Uses a C_row_columnaming scheme. - Find Local Minimum:
Move the selected point to the local pixel value minimum within the local square.
- Find local Maximum:
Move the selected point to the local pixel value maximum within the local
square.
- Snap To Minimum:
Snap the selected point to the local pixel value minimum within the local
square.
Script Window
Toggle show/hide the scripts window. Click this to show the scipts window and notice that some example
scripts have been included with the distribution. Expand the 'Example Scripts' tree and double-click a script.
It will open in a new window and can be executed by hitting 'F5' or via 'ScriptsSelection Area Window [S]
See 'Select
Select Multiple or Reorder Images [Shift+S]
Select multiple images for image operations to be performed on, or reorder images within the main HDR Shop
window. Toggle show/hide the window via it's menu entry or with 'Shift+S'.
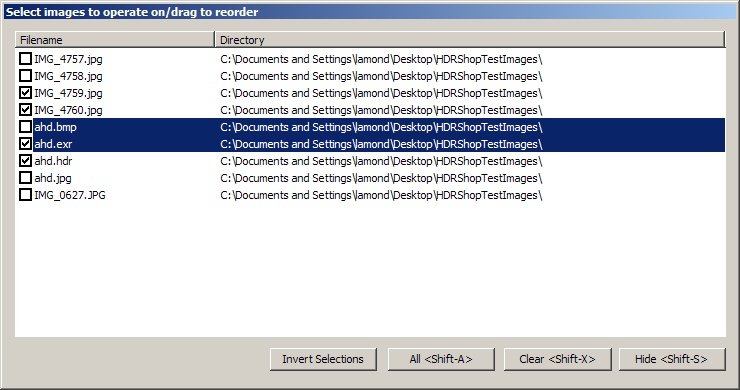
Selecting multiple images to be operated on:
Each image in the window has a checkbox to the left of the image name. Simply check the desired images then hit 'Shift+M' or click the status bar pane to toggle state or select 'View
Select all/none of the images with the respective buttons/keystrokes displayed in the window. The 'Invert Selections' button toggles the current state of all checkboxes in the window
Reordering images within the main HDR Shop window:
Simply left-click-drag and drop the images around in the list until the desired order is obtained. Images are reordered dynamically as soon as they are dropped into place.
Fullscreen [Ctrl+Enter]
Toggle HDR Shop fullscreen/restored view.
`Help' menu
Register HDR Shop...
This window will likely be the first you see when HDR Shop starts for the first time. Shows a unique 'Hardware ID' linked to the machine currently running HDR Shop. Clicking the 'Submit' button will start a Web browser where the user must enter their email address and Licensee information. Once this information is submitted, the developers will generate a unique key based on the ID which must be entered in the 'Register' dialog box before clicking 'OK'. HDR Shop will close and will now be fully functional when restarted.About HDR Shop...
Information about the software.Quick Help... [Ctrl+H]
Display the 'Quick Help' dialog - several pages of abbreviated instructions on keyboard and mouse controls used to operate HDR Shop. See 'Getting Help' (5.2)Open Online PDF Manual in Browser
Opens the PDF version of this document in your default Browser.
About this document ...
This document was generated using the LaTeX2HTML translator Version 2008 (1.71)
Copyright © 1993, 1994, 1995, 1996,
Nikos Drakos,
Computer Based Learning Unit, University of Leeds.
Copyright © 1997, 1998, 1999,
Ross Moore,
Mathematics Department, Macquarie University, Sydney.
The command line arguments were:
latex2html -split 0 -dir HDRShop3_man_html_1page HDRShop_v3_man.tex
The translation was initiated by lamond on 2009-03-16
Generated by Bruce Lamond on 2009-03-16